
(This is a slightly modified version of something I wrote as part of a discussion on Google+)
The author of the post that I read before writing this mentions two alternatives for dealing with dynamic range issues in landscape scenes – the use of graduated neutral density (GND) filters or the use of a similarly-named post process technique in Lightroom. (Similar processes are available in other software including Photoshop/ACR.) Another alternative is to use HDR (High Dynamic Range) techniques that allow computer algorithms to combine source images in ways that are not the same as what I describe in this post. I almost always use a different approach, exposure blending, and I’d like to share a few ideas on this topic.
When the scene contains an extremely large dynamic range – a common situation in landscape photography – it is possible to end up with shadow areas that are nearly black and devoid of detail, along with bright areas that are blown out and also completely lack detail. (The latter is especially an issue with digital capture in which overexposed areas can simply become pure white. Film failed more gracefully in this situation.)
One traditional method for dealing with such scenes is to attach various types of graduated neutral density (GND) filters to the front of the lens. These filters include a clear area and an area darkened by a few stops. A typical use might be to position the dark portion over the sky and the clear section over a darker foreground, effectively reducing the dynamic range of the light reaching the sensor by reducing only the brightness of the sky. With film, especially positive transparency film, this was just about the only realistic way to handle the situation in many cases.
A second method is to make a single exposure and use features in Photoshop/ACR, Lightroom, or other software to simulate the effect of the GND, lightening (or darkening) a portion of the photograph. This can often help quite a bit when it comes to balancing out dark and light areas in the image, and the fact is that most savvy landscape photographers do this sort of thing and more in post. But it has its limits. For example, darkening a bright area cannot put detail back in blown out areas, and lightening underexposed shadows can lead to problems with noise and posterization. The bottom line is that this technique works well when the overall range 0f brightness in the scene does not exceed the dynamic range of the camera – here it may be used to adjust the relative levels of the areas – but it does not work well when the dynamic range is actually too great for a single normal exposure.
There is a third method, sometimes called exposure blending, that can often be used when making the exposure. The idea is to make more than one exposure, with each exposure optimized for different parts of the scene by varying shutter speed, and then selectively blend the two exposures during post-production.* Two exposures are sufficient in almost all cases, with one for the shadow detail and the other for highlight detail – though in very complex or wide dynamic range situations more exposures can be used.
Why not just use the GND filters to accomplish the same thing? While the GND does have the advantage of letting you see the effect immediately and of requiring only a single exposure, the exposure blending method provides a number of capabilities that are not really available to users of the GND filters.**
- Obviously, there is no need to carry and fiddle around with filter holders and filters in the field. This has implications concerning the amount of gear one carries, the process of setting up to shoot, and even cost. (GND fans will point out that you do need to carry and use a tripod, though there are alternatives here, too. Some of them also say that they enjoy the “fiddling!”)
- With exposure blending, the photographer is not limited to the two- or three-stop differential built into the filters. The difference in exposure can be whatever is optimal for the scene: one stop, 2 2/3 stops, 4 stops, whatever.
- The division between the dark and light areas of the scene need not be linear. Imagine shooting from inside a dark canyon and into the light of bright land beyond. You would need a v-shaped GND (hint: you don’t have one) but it is easy to divide the two exposures along this v-shape or virtually any other shape when you use masks to blend the exposures in post.
- The division between light and dark need not have the same sort of blend everywhere in the frame. In one area a wide feathered area might be appropriate to disguise the blend, while in another area a sharper gradation might be more appropriate.
- You can subtly vary the contribution of the dark and light exposures almost infinitely . For example, you might want to bring back a little bit of detail on a blown out bright area of a boulder by adding a small amount of the darker exposure, but only a little – so use a mask with perhaps 50% transmission to allow a bit of darker area through.
- You can have more than two levels of brightness. I have several photographs that could only have been made by combining three separate exposures, and the result looks much more natural done this way.
Of course, you must typically use a tripod for your component shots – but most landscape photographers are already doing this. If you don’t want to use a tripod, a number of cameras can automatically produce a sequence of exposures quickly enough that the camera can be carefully handheld.
Finally, a photograph made using exposure blending, in this case using three exposures:
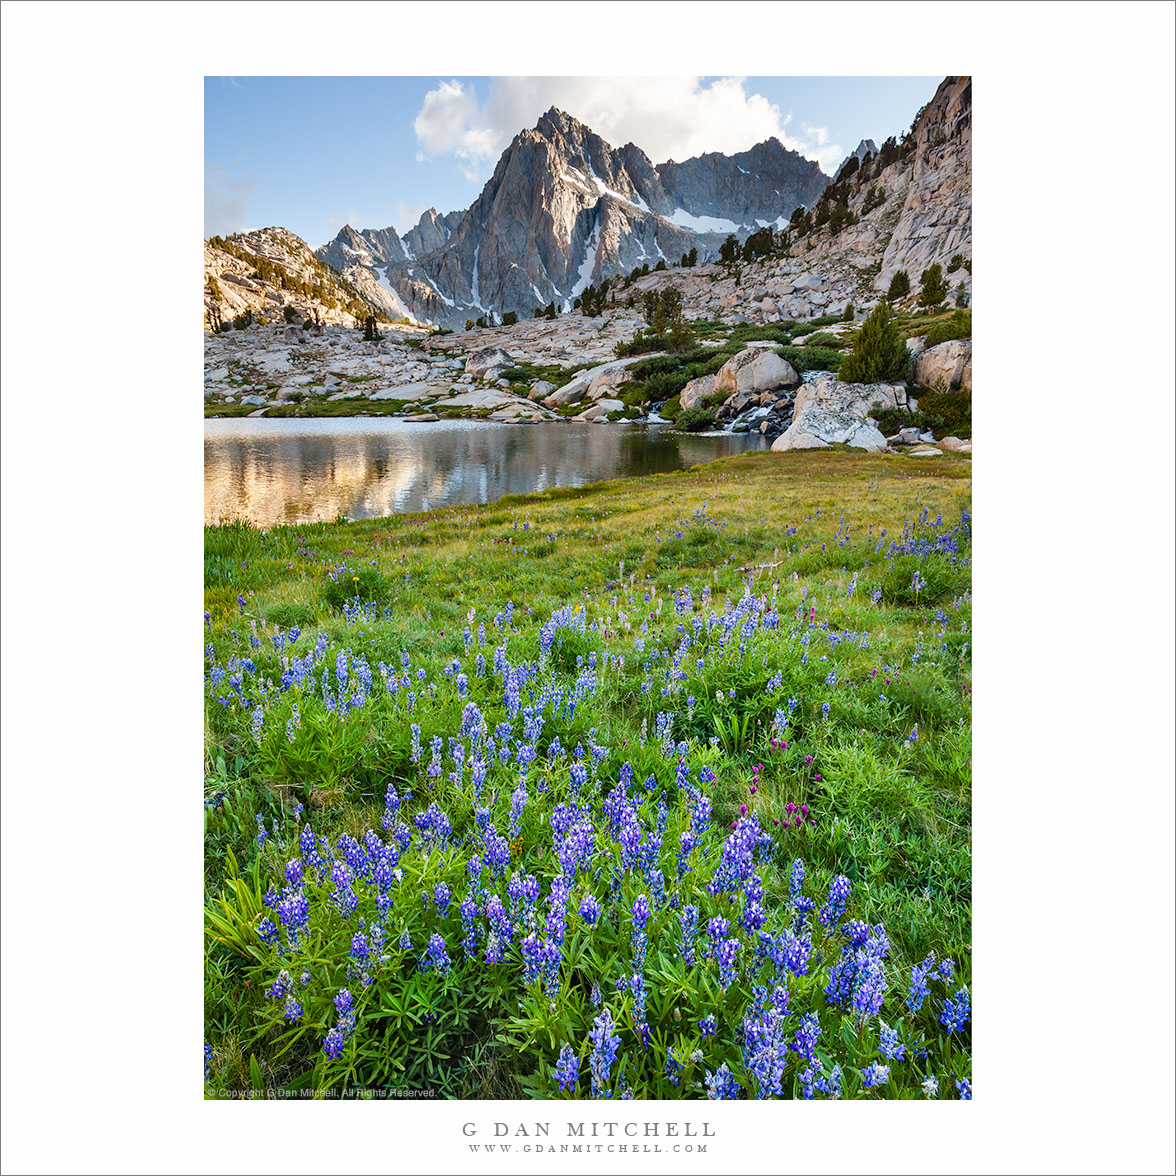
This photograph would have been, in my view, essentially impossible to produce using only a GND filter. The dynamic range was huge, since bright sunlight illuminated the white cloud tops and the foreground flowers and meadow were in soft light from the shadow of a nearby ridge, while the peak and middle ridge at the end of the lake were lit in a less extreme manner. The best compromise might have been to use a soft GND over the middle low ridge, but that would have ended up considerably darkening the shadow areas of the peak and leaving the far edge of the meadow somewhat unnaturally bright by comparison to the flowers.
Note:
- It occurred to me after I wrote this that my “third method” of using multiple exposures actually includes two sub-methods. The one I’m describing and referring to as “exposure blending” is a manual post-production process that more or less combines the “best” portions of the two (or more) images by means of masked layers. The second method – which I’m not describing and which I do not currently use – is the HDR (or “High Dynamic Range”) approach which generally automates the process of combining three or more exposures in a way that can create extreme amplification of local contrast. It can also be used in a more subtle way.
** There are situations in which subject motion can make the use of the blended exposure method more difficult or even inappropriate. In actual practice, such situations are far less common than those who don’t use this approach might imagine. For example, it is often the case that the entire moving area can use one or the other of the exposures – in other words, this part of the frame may not need to be blended at all.
Leave a comment or question using the form. (Click the title to see the full article and to comment if you are viewing it on the home page.)
G Dan Mitchell is a California photographer and visual opportunist. His book, “California’s Fall Color: A Photographer’s Guide to Autumn in the Sierra” (Heyday Books) is available directly from him. Blog | Bluesky | Mastodon | Substack Notes | Flickr | Email
All media © Copyright G Dan Mitchell and others.
My response didn’t post; hitting return might cancel it. I think that you have hit the correct answer. I might not have switched autofocus off. Shifts are not uniform throughout. The left wall of a canyon might be perfectly aligned but the right one (often at a different distance even tho both might be 100 or more yds away) would be very slightly off). Thanks very much for the tip and very quick response. Hope to see you on the trail or off it in the backcountry.
I must have run out of room, because the message sent before I said:
Thank you very much for this insight – hope to see you on a trail.
Karl
“Karl” wrote:
Thanks for writing Karl. This brings up a number of questions.
The most common sources of misalignment are, I think, changing the aperture rather than the shutter speed when achieving the various needed exposures, leaving the camera’s autofocus on with the result that the camera focuses slightly differently on each component image, and some change in the camera’s position between exposures.
You mention that you don’t change aperture, so that can’t be it. (I assume that you are shooting in manual mode or else aperture-priority automatic exposure mode.)
You didn’t mention whether using auto-focus or focusing manually. If you are using AF, once your camera AFs the first exposure switch AF off so that the exact same focus point will be maintained for all of the component exposures. Shifting the focus, even a little bit, can cause the sort of alignment issue you mention.
We can’t rule out some change in the camera position, though that should be easy to align in post since it should shift all parts of the image by the same amount. You probably already know that you can minimize these slight shifts by waiting a few seconds for the camera to stabilize before tripping the shutter, using live view or mirror lockup to minimize vibration, waiting for any breeze to stop, and being very careful not to move the camera while changing settings between shots.
Since you have the first problem covered, and the third should be easy to solve via the normal alignment methods, I have to wonder if the second might play a role.
In some cases you might be able to “fix” things enough to avoid those “ghosting” issues by stretching and warping all or portions of the image a bit in post.
You are right that misalignments can be very problematic if they remain in the final print. A year ago I visited a newly opened gallery and saw prints of several interesting scenes in which the alignment was very noticeably off – I was somewhat stunned to see such an obvious error in post-processing on prints that were being offered as fine art photography at very high prices.
Dan
Hi Dan,
I love your work by the way. I do some HDR but also use your same exposure blend process afterwards. If you look at my website or my g+ page you can see the result. I blend several exposures to create a HDR with photomatix and then drop them into photo shop with the original tiffs. I do very few adjustments in photomatix however and never touch things like color saturation. Once I am in photo shop I blend my exposures the same way, I just start with the HDR composite first. I would love to see you try this out, sometimes there are incredible things that come out of photomatix. I think more people who have good results if they used photomatix just as a starting point and did not do play with the settings in it so much. Justin
Thanks for your comment, Justin. I’m not one of those anti-HDR photographers – though I do sometimes cringe a bit when I see it overused. It turns out that, as you probably already know, HDR can be used in very sophisticated and subtle ways and even combined with exposure blending and other techniques. I’m not going to give anyone’s secrets away, but I know for a fact that certain photographers whose work one might not associate with techniques like HDR actually do use the technique occasionally and in ways that enhance their photographic results.
Dan
That’s interesting – I haven’t looked at that tutorial in years, but I do now recall it. I used the initial method of selecting just the brightest pixels at one point in the past, but I don’t use it at this time. However, I can see that it might be useful to add it to my bag of tricks.
I have an alternate way to operating on just a particular luminosity range that comes from “locking down” the curve and then adjusting the unlocked portions of it. This is pretty tricky to explain in words, but I’ll be sure to include it in some sort of tutorial that I’ll write before long.
Dan
Dan,
Do you ever use Tony Kuyper’s ‘luminosity masks’ technique to do your blending? Since I’ve become (somewhat) proficient with that style, I rarely do any ‘hand painting’ in my blending any longer.
I’m a little less enthused about his ‘saturation masks’ technique, but would feel lost w/o the above these days.
And – another comment on exposure blending – I sometimes successfully use an HDR blend in combination with a single optimal exposure, using the HDR image to paint in details in shadows and highlights – while keeping the transition clean and minimally visible.
Richard, both of these are really interesting ideas… but I haven’t done either! I suppose that I have “accidentally” almost done the first by combining images shot at the same ISO but different shutter speeds in which the amount of motion blur was different in the two sections.
Your HDR idea is a really interesting one. I can see how that could work pretty well. I do “paint in” the detail from my underlying image, though it is normally a single image rather than a HDR composite. I’m betting that the HDR could provide more detail even though less of it was revealed through the mask.
This does raise a very interesting idea regarding HDR. Quite a few people are not fond of the “HDR look” that, to their (and my) eyes overdoes things and creates an appearance that is not natural. (To be fair, I do not believe that all photographs should “look natural” – but that is a different and more complex topic for another time.) However, a lot of photographers are using HDR techniques in ways that do not shout “HDR!” For example, I have been quite surprised by the number of landscape photographers who are now discreetly using some HDR to bring out shadow detail in this photographs, but doing it so subtly that you would never think that there were using this technique.
I have an idea. Since you have some experience with both of these techniques – your application of HDR and your use of different ISOs in the component images of a blend – if you write up something at your blog I’ll share the URL here. Or perhaps you would like to do a guest post here?
Dan
Dan – Another great article – thanks for all of your teaching.
I also wanted to suggest that you might address the use of “exposure blending” to enable the use of multiple ISO exposures in the same image – a technique that can effectively enable the capture of water streaming over a waterfall at low ISO long exposure, while enabling you to step up the ISO and capture the surrounding foliage at a higher shutter speed, to minimize motion blur from wind blown leaves. In fact, it is even possible to combine both techniques – image blending to capture a broad range of exposures while simultaneously using image blending to stop motion in one part of the image – while capturing motion blur in another part of the image.
Again, thanks for all of your great articles!
Barry, thanks for your post and your kind words. I have it in my “to do list” to eventually write and post a sample case illustrating how I use exposure blending – perhaps sometime in the next week or so.
For now let me share a few basics about what I do:
1. I use ACR to do my raw conversion, typically adjusting source file to minimize over and underexposed areas before bringing them in to Photoshop.
2. I bring the two (or, rarely, more) source images into Photoshop as smart layers.
3. I stack them so that the image that I think of as being “primary” is above the one containing a few areas that will replace those in the primary image.
4. I carefully check the alignment of the images by zooming in to 100% and playing with the opacity level of the upper layer. Usually good shooting technique ensures perfect alignment, but not always!
5. I add a mask to the upper layer and most often simply “paint in” areas from the lower level manually. I’ll usually use a brush at 30%-50% whose hardness level is in the 50% or softer range. By varying brush size I can generally make the borders invisible to viewers.
6. Sometimes if I need to work on a large area I may use a gradient or some other sort of selection to, for example, bring in the foreground of the lower image in one stroke. After doing this I generally need to go back and touch up manually with the brush tool.
More to come…
Dan
Hey Dan,
Good stuff here, and it happens I agree with all of it. I even sold my GND filters and holder earlier this year because I rarely got results I liked, and have found it not too difficult or time consuming to blend multiple images in post, not to mention superior results.
I would be curious to know your blending technique.
I took one of Jay and Varina Patel’s webinars a year ago or so, called Intelligent HDR. It makes use of channels to generate masks, and with subsequent tweaking of the mask can yield very natural looking images.
Of course, sometimes a simple layer mask and brush strokes work fine, and often I’ll use Smart Layers to double process my raw images, for another simple blend technique.
I always enjoy seeing/reading your posts around the web. You have a gifted eye for composition and always show very pleasing natural light.
Thanks,
Barry