(Note: I update this article periodically, most recently in August 2019.)
I do a significant amount of backpacking every summer, and almost every season I spend as much as a few weeks on the trail in the Sierra Nevada, in addition to other non-backpacking trips to the Sierra and elsewhere. I’ve been a backpacking photographer for nearly five decades, and I’ve evolved (and continue to evolve) an approach to backpacking photography that works well for me.
Decades ago, I carried a couple of small 35mm film cameras and a few prime lenses on the trail. (I think my favorites were a Pentax ME Super and a Pentax MX with a small set of primes, a tele-extender, and some extension tubes. But I digress….) Some years later, when I first used a digital SLR, I worked out a pretty good back-country photography kit based on a small “Rebel” style Canon 350D/XTi. For many photographers there are real advantages in using one of the smaller cropped sensor bodies – less bulk, less weight, smaller lenses, and quite fine photographic quality. One of the four-thirds system bodies can also be a great compromise for some, and the newer mirrorless cameras offer some very interesting and lighter possibilities — though check their battery capacity first. However, I eventually moved to full frame, and acquiring a full-frame 5D forced me to think more carefully about what I carry.
(Update: In early 2013 I acquired the Fujifilm X-E1 Digital Camera along with a few of the excellent Fujinon lenses. In 2016 I updated to the Fujifilm X-Pro2 plus Fujifilm’s 16-55mm and 50-140mm lenses for an alternative lightweight trail setup. More on this follows.)
While I would like to have all of my gear with me, the load would be unmanageable. (At least at this stage of my life. When I was young, strong, and foolish in different ways than I am now, I would sometimes head out onto the trail with loads weighing up to 75 pounds. No more! On the other hand, pack train support is a viable option in some cases.) Ironically, while I have lightened my load of backpacking equipment considerably during recent years – moving more in the ultralight direction – my photographic equipment load has increased. The bottom line is that I consider very carefully what I carry, considering the upsides and downsides of each piece of equipment and occasionally making compromises if I think a piece of gear can be left behind on a given trip.
Here’s what I might carry these days when I go out with my full-on landscape photography system:
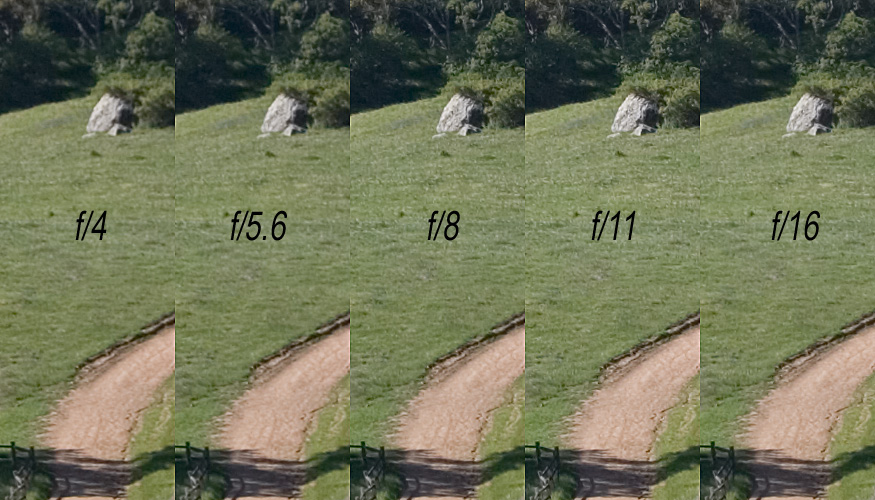
- Canon EOS 5DS R — (Until recently I carried a Canon EOS 5DII — which Canon replaced with the Canon 5D Mark III — and I previously used a Canon 5D) – Heavier and bulkier than the cropped sensor bodies, but worth it to me for the higher resolution and the better small aperture performance. The Nikon D810 would be an alternative if I were a Nikon shooter and Sony photographers might choose the a7RII Mirrorless Digital Camera.
- A standard zoom lens is typically on my camera by default. They cover a range from decently wide to slightly long.
- The Canon 24-105mm f/4L II IS (I have the older version I) is a great standard lens for many purposes. If I’m willing to forego a bit of reach the 24-105mm range can be a viable one-lens option. The 24mm wide end is also wide enough for many situations. The inclusion of image-stabilization (IS) helps when shooting handheld when I’m on the move. For this type of lens, the weight and size are not too bad at all.
- The EF 24-70mm f/2.8L II offers somewhat better image quality and is a fine lens for tripod-based photography when I’m willing to carry a bit more weight.
- The EF 24-70mm f/4L IS is a fine lens that is smaller, lighter, and less expensive than the f/2.8 24-70mm lens, and there are good reasons to regard these as advantages. It also has image stabilization and enhanced close-focus capabilities. (I have not used this lens.)
- Current versions of the Canon 24-105mm f/4L II IS, EF 24-70mm f/2.8L II, and EF 24-70mm f/4L IS lenses at B&H.
- I usually carry an Ultra-wide zoom lens. (When I use a two-lens system, either this type of lens or a 70-200mm accompanies my standard zoom. )
- The Canon EF 16-35mm f/4L IS lens is my preferred lens for some types of landscape work, often done early or late in the day when I’m not carrying the backpack and can therefore more easily work slowly and with a tripod.
- For many years I relied on the Canon 17-40mm f/4 L lens to cover ultra-wide angle photography. It is still a useful lens and an excellent value at much lower price. Its image quality is not as good as that of the excellent 16-35mm f/4 described above, though it can perform reasonably well at smaller apertures typically used in much landscape photography.
- (EF 16-35mm f/4L IS lens and Canon 17-40mm f/4 L lens at B&H.)
- A Telephoto Zoom lens is very useful. Not only does it provide almost twice the “reach” of the mid-range zooms, but it can work well for close-up work where the longer focal length provides narrower DOF and good bokeh. The lens gets its own padded Lowepro case and usually rides inside my main backpack.
- The Canon EF 70-200mm f/4L IS may be the ideal backpacker’s telephoto zoom. It is lighter than the f/2.8 versions, but with IS the f/4 maximum aperture is no liability for most backcountry use. Image quality is excellent. (There is also a version of this lens without image stabilization at a significantly lower price.)
- The EF 70-200mm f/2.8L IS II is excellent for many things, but its heavy weight and large size can make it less ideal for backcountry photography — so I only carry it when weight is less of an issue, for example when I go in with pack-animal support. (Canon EF 70-200mm f/4L IS and EF 70-200mm f/2.8L IS II at B&H)
- Teleconverter — I often carry a small and light Canon Extender EF 1.4X III, a 1.4x teleconverter that gives my 70-200mm lens the reach of a 280mm focal length. A slightly larger and heavier and more expensive Extender EF 2X III is also available, and it gives the 70-200 a 400mm maximum focal length. (Extenders also decrease the maximum effective aperture, and those considering the 2X model should verify that it will work correctly with their cameras, since not all bodies will autofocus with lenses that don’t have a maximum aperture of f/5.6 or larger.)
- Circular polarizing filters — These filters are useful in many ways. They can control reflections when photographing water and foliage; they can increase the definition of clouds; they can function as a sort of stand-in neutral density filter.
- 9-stop neutral density filter — This is a useful filter for certain types of images that require longer daytime exposures. (To be honest, most often I do not carry it into the backcountry.)
- Batteries — I take a lot of photographs sometimes, and I also like to do night photography. I don’t want to be caught short, so I typically carry at least three batteries and often more, especially if I think I’ll be doing night photography and/or using Live View a lot.
- Solar Charging System — On very long trips a solar charging system is necessary to recharge batteries on the trail. I have written a bit more about this later on this page.
- Multiple large capacity CF cards — I carry a lot more card capacity than I think I’ll actually need since cards are light and relatively inexpensive these days, and I’d rather carry too much than run out of storage capacity. These days, using dual-slot cameras, I use two 128GB cards per camera. I set the camera to save duplicate copies of the raw files on the two cards, giving me some additional peace of mind should a card fail. (In the unlikely event that I fill the 128GB cards and run out of space, I can reform the second card and and continue shooting on the second card, foregoing the second-card backup.) On pack-train supported trips I may bring a very small laptop for making backup copies from the cards. (Some tablets could work here, too.)
- Tripod — A backpacking tripod almost by necessity requires some attention to compromises among size, weight, cost, reliability, and stability. For non-backpacking use I prefer a very large and rather heavy tripod that I would not want to carry or try to attach to the pack I use for backpacking. So while I miss the solid functionality of that tripod, issues of weight and packed size lead me to use smaller and lighter gear in this case. Photographers will be comfortable with different types of compromises here, so the choice of the right tripod will be a very individual and subjective one. In the backcountry I use a Gitzo GT2542L “Mountaineer” Tripod, which has be updated to the Gitzo GT2543L “Mountaineer”. (This “L” model is about 5″ taller than the regular Gitzo GT2542 “Mountaineer”.) Although not every backpacking photographer needs such a large and expensive tripod, I prefer this relatively tall Gitzo model. With four-section legs it packs to a reasonable – though not exactly tiny – size, yet when legs are fully extended it holds my camera at eye level. I use a center column so that it will go even higher or accommodate uneven ground. The Gitzo Mountaineer models have a well-deserved reputation for great construction and for providing stable camera support. After using it extensively since 2011, including an multiple backcountry photography in the Sierra, I can recommend it without hesitation. (Gitzo GT2543L “Mountaineer” and Gitzo GT2542 “Mountaineer” at B&H)
- Acratech Ultimate Ballhead — This tripod head weighs only about one pound and works very well – this is a great backpacking ballhead, and one that I can use for some of my “regular” photography as well.
- Lowepro Toploader Zoom AW bag — I use this with a chest harness to hold the 5D plus the 24-105 (with hood), along with most of the other photo gear. The bag is sturdy and includes a rain-cover – though the whole thing can go into my main pack in case of truly bad weather. (The 17-40 could ride in the backpack in a smaller Lowepro lens case, but most often it fits crosswise into the bottom of the Topload bag.)
- Canon remote release
- Assorted accessories – Lens cleaning cloth, sensor brush, blower, Philips wrench, etc.

I never have had the courage to weigh the whole mess, but I think it is somewhere in the 12-15 pound range… or more. By the standards of my ultra-light backpacker friends (whose total backpacking base load may be 12-15 pounds… or less!) this is an outrageous amount to carry. On the other hand, fellow photographers may be wondering how I managed to get by with only limited lenses and a small tripod!
(Speaking of weight and bulk… In August 2008 I met a fellow at Moraine Lake in SEKI who was carrying two Nikon DSLR bodies and four lenses! Later that summer I met an experienced Yosemite back-country photographer equipped with three complete systems: full-frame DSLR, medium format digital, and large format film! Not surprisingly he had arrived with the assistance of a pack train. I have met another well-known and highly regarded black and white photographer and his wife in the backcountry, and each of them carried more than 30 pounds of medium format film gear. I guess all of this makes me a photographic wimp!)
I also have a lighter alternative system based on a mirrorless cropped sensor camera.
- My Fujifilm X-Pro2 24MP mirrorless crop-sensor system is considerably smaller and lighter than my DSLR system. Many backpackers looking at a high-end Fujifilm system may prefer the Fujifilm XT2, a 24MP cropped sensor mirrorless camera with a design that feels more like a DSLR. The Fujifilm XT20 provides the same sensor in a body with fewer features and a lower price. These cameras have progressed to the point that they can produce truly excellent image quality — enough that I can make stunning 20″ x 30″ and larger prints. One thing to consider is that the battery life is shorter in these cameras than with typical DSLRs — I may get only about 300 or fewer shots from a battery with the Fujifilm camera, while I could get over 1000 with my 5DsR. (Though using “live view” mode on the DSLR can essentially erase this advantage.) And, of course, there are alternatives to Fujifilm from other manufacturers who also produce high quality cropped sensor systems.
- Lenses for cropped sensor cameras also tend to smaller than lighter than their equivalents on full frame cameras. (I won’t get into all of the gory details here but, for example, a 23mm lens on my Fujifilm camera gives me the same “reach” as a 35mm lens on my full frame system.) I carry two lenses, Fujifilm’s 16-55mm and 50-140mm lenses, which are angle-of-view equivalents to approximately 24-82mm and 70-210mm full-frame system lenses.
Note: Some photographers are now using the full frame Sony Alpha Mirrorless Digital Camera, which provides high MP resolution, full frame format, and lighter camera weight than DSLRs. Note that battery life, as with all mirrorless cameras, is shorter, and that the weight savings probably don’t extend to your lenses, at least if you use the same types of lenses that you would otherwise use on a DSLR.
There area some things that I do not take:
- I do somewhat miss my full size Induro C313 tripod, but not nearly as much as I expected – and certainly not enough to carry the extra bulk and weight. My Gitzo mountaineer is perhaps a tiny bit more spindly, but it really is a solid tripod.
- I usually do not miss my longer and heavier EF 100-400mm f/4.5-5.6L IS II USM Lens. I may have missed a very small number of shots by leaving it at home, but I’m generally more interested in short telephoto to wide angle in the back-country. (I might take the 100-400 instead of the 70-200 if I were headed into an area where knew that the extra reach would be needed – for example, if certain wildlife opportunities were my goal – but I would begrudge the weight!)
- I do not carry prime lenses. Zooms provide excellent image quality, far more flexibility, require fewer lens changes, and are probably not really much if any heavier than carrying an equivalent range of high quality primes.
The large Lowepro Topload bag with the chest harness is (pardon the awful pun) a mixed bag. It really is a fine product and the chest harness system is effective. You can even use it as a virtual shoulder bag by disconnecting a couple of the four strap attachment points. It is great to be able to fit much of my photo equipment into one sturdy, weather-resistant, manageable and accessible bag. There are downsides, though – not the fault of Lowepro, but just the result of trying to accommodate all of the needs of the backpacking photographer with one bag. One unavoidable issue is the size of the bag, especially when carried on the chest. In rough country it is a disadvantage to be unable to see your feet! I have become adept at looking around the sides of the bag in many situations, though I have to be more careful of my footing in when traveling cross country. Trekking poles become even more useful. During extended cross country sections (such as class 2+ routes) I sometimes feel more comfortable removing the bag and carrying it inside my main backpack. Having issued these disclaimers, I still rely on this bag and recommend it strongly.
File Storage
Several important issues come up when we consider the safe storage of digital images on the trail. The most obvious concern is that you carry enough storage card capacity for the number of photographs that you intend to make. The second concern, and it is arguably just as important, concerns how you will store and back up your precious files on the trail.
Fortunately, memory cards are relatively cheap and have very large capacities these days. Available capacities can store thousands of files on a card. Most photographers won’t make so many photographs on one trip that they won’t fit on a single card, though carrying at least one extra is wise in case you encounter a problem with your primary card.
If you anticipate making more photographs than you can fit on a card, it usually simply makes sense to bring more cards! Again, they are small, light, capacious, and inexpensive these days.
Ensuring the security of your files on the card is a bit more complicated on the trail. You probably aren’t carrying your laptop, so you can’t backup to that. (On stock-supported trips I do sometimes bring a small laptop and a separate external drive for backups.) A first-line of defense is to use a camera with two car slots and set it up to write duplicate copies of each photograph to the two cards. This provides a backup in the event of a card failure. Extra-cautious photographers might remove one of the cards and store it in a separate location. (I’m usually not that cautious.)
There are small external drives that have built-in card readers. Given their costs and power consumption issues, I don’t carry them, though I have friends who do use them.
The Issue of Power
Digital cameras use electricity. I’ll bet you knew that already! Batteries have a finite life and then they need charging. On short trips this isn’t an issue, but if you go out for more than a few days it is important to plan and consider the options.
If you tend to shoot handheld and use a typical DSLR, you may get many hundreds or even a few thousand photographs from single battery. Unless you are a very productive photographer, a single battery — probably with one backup — will likely get you through most trips.
However, the battery concerns loom larger if you don’t fit that description. For example:
- If you use a mirrorless camera you may only get a few hundred frames per battery.
- If you use “live view” mode (as I do) you may get only a few hundred or fewer exposures per battery.
- Extensive review of your photographs draws more power.
- If you do any night photography you can use up more than one battery in a single night.
If the trip isn’t overly long, the most effective solution in terms of both cost and weight is simply to carry more batteries. I often carry four or more, and this can get me through a week of photography in many cases.
On longer trips or if you consume batteries at a prodigious rate, you may need to use a solar charging system. Given their cost and weight, carefully consider the first option of carrying more charged camera batteries — it takes quite a few camera batteries to add up to the weight and cost of the solar chargers. Also keep in mind that the high power chargers may tend to keep you (or at least the charger system) in camp, as they need to sit out in full sun for hours. (You can hang chargers off the back of your pack while walking, but there are some issues with that solution, especially for photographers.)
I use solar charging equipment from Voltaic Systems, but mostly for trips with pack-train support. Smaller systems that can provide enough power for a daily battery charge are viable and can allow you to reduce the number of batteries you carry. Note that reliable solar-chagring systems are not always light or inexpensive — they can weigh and cost as much as a number of batteries. Another option is to charge the system’s battery at home and then bring the battery without the solar panel on the trail.
One More Thing
As photographers who are willing to go to great lengths to carry ourselves and our gear into beautiful and wild places in order photograph their beauty, we have a special obligation to protect these wonders and the solitude that surrounds them. We should be careful to minimize our impact on these places, and once there we should treat them with care and respect.
In addition, I think it is worth striving to reveal through our work the deeper and more fundamental beauties of such places. While bagging — and showing off — another shot of a familiar icon has its appeal (and yes, I do photograph icons sometimes) inventing a visual world that seems to consist exclusively of such atypical and often iconic things presents a false view of the subject and misses the opportunity to look for something deeper in our own photography. Much of the best back-country photography that I have seen reveals things that are only known to those who spend long, quiet time in these places, returning over the years to develop a deeper knowledge and understanding of their subjects.
Finally, I have become increasingly aware of the (often unintentional) role that photographers can play in encouraging the overuse and over-popularity of certain fragile and special places. I’m not one to try to keep “private places” for myself – they aren’t mine anyway – but I think we all need to exercise a great deal of discretion about saying too much about places that cannot handle even a few more visitors. This has been difficult for me, since I love to share my stories about the places I visit, but I’m now convinced that it is more ethical to concentrate on the photographs and the experience while saying no more than necessary about the geographical specifics.
Questions, comments, observations? Feel free to post below!
Notes:
- Another article, “A Few (More) Thoughts on Back-Country Photography” may interest you, too.
- Product links in this post go to site-sponsor B&H photography.
G Dan Mitchell is a California photographer and visual opportunist. His book, “California’s Fall Color: A Photographer’s Guide to Autumn in the Sierra” (Heyday Books) is available directly from him.
G Dan Mitchell: Blog | Bluesky | Mastodon | Substack Notes | Flickr | Email
All media © Copyright G Dan Mitchell and others as indicated. Any use requires advance permission from G Dan Mitchell.