Tag Archives: acr

Sharpening Basics: A Primer

(Minor updates to this article were made in February 2019.)

Sharpening is a very important step for optimizing digital photograph files. If you let your camera save images in the common .jpg format (a compressed image format that is often used on the web) the camera is applying sharpening to the image produced by the camera sensor. If you use the raw format (a high quality format that retains the original sensor data of the exposure) you will find that the photograph looks soft until you apply sharpening during the post production phase.

Sharpening optimizes the visibility of details that are already in your photograph. It is a matter of more clearly revealing what is in the photograph than  a matter of creating detail where there was none. Most sharpening works by increasing the contrast between light and dark areas in the image — what we call sharpening as actually more about adjusting the relative brightness of adjacent portions of the photograph.

Typical sharpening

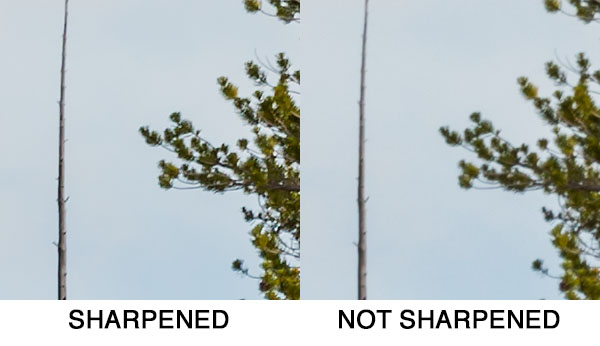
The image above is an example of a small section of a photograph.[1] It is a “100% magnification crop” of a tiny area from a much larger photograph made with a high megapixel DSLR camera. A “100% magnification crop” is an image displayed so that each pixel — or individual picture element — of the original photograph is displayed using a single pixel on the screen. (Things are a bit more complicated than that when using modern high-resolution monitors, though I’ll let that description stand for now.) 100% magnification crops let us look very closely at what is going on in photographas “at the pixel level.” In this case, the full original image from which these small examples were extracted would be equivalent to prints at a width of roughly 10-12 feet.

The right side of the example shows this tiny section of the photograph before sharpening. The left side shows the results of fairly typical sharpening. Continue reading Sharpening Basics: A Primer

A Photograph Exposed: Technique and Interpretation in Post

(“A Photograph Exposed” is a series exploring some of my photographs in greater detail.)

Island and Trees, Tuolumne River
Trees grow on a small, rocky island in the Tuolumne River, Yosemite National Park

If you follow this website you may have seen this photograph before — it is one of two that were the subjects of an earlier article (“A Photograph Exposed: One Subject, Two Compositions“) focusing on compositional decisions I made when I photographed this Sierra Nevada subject. In this companion article I want to look at the next step — going from that original exposure to the final (at least for now!) interpretation of the subject that you see above, and the how and why of post-processing the image.

For me, post-processing is as much a part of the creative process of photography as is composing and making the exposure. In fact, many of the decisions that I make at the time of exposure anticipate what I may do during the post-processing stage. These decisions recognize that the camera does not “see” the same way that we do, and that simply trying to produce an exposure that looks the exactly like the actual scene is often both hopeless and counterproductive. Continue reading A Photograph Exposed: Technique and Interpretation in Post

How I Sharpen – An Overview

(I originally wrote this article way back in 2009. Some portions were revised in February 2019 to reflect changes to sharpening tools and some different ideas I have developed regarding sharpening settings. It was updated and modified again in 2023.)

I just posted something elsewhere about how I sharpen for prints and I figured I’d get some extra mileage out of it by posting it here as well. First, few disclaimers…

  • The title of this article originally referred to a “quick overview.” Clearly, it is too long for that! But there are whole books on sharpening, so by contrast I think this qualifies as a quick description. In fact, I’ve left a lot out of the description!
  • There are people with far more expertise on this topic than I have, and I have no illusions that this description represents the “right” way to do this, much less the “best” way!

The subject of how to sharpen photographs in post for print or electronic output is one that confuses many people… and a subject to which many books, online articles, and forums posts have been devoted. There are any number of ways to get the desired results via sharpening, and different techniques are called for depending upon taste, the nature of the image, and the final form of presentation: size? print? jpg? etc…

Here is a general description of what I do when I print. I’ve left some variations out of this description. The description also covers software that I use in my workflow — you might prefer something different, but you might still be able to adapt these ideas. You’ll note at least one controversial method later in the list, but try it before you dismiss it. The approach I use could well be “over-kill” if you just want to pump out a bunch of jpgs to share with friends and family or if you want to make some small prints — my end goal is good sized prints, and I work on each one rather carefully rather than mass-processing them and printing a bunch at one time.

And please understand that I’m most certainly not implying that my way is the right way. It works for me, and that people who view my prints often remark on their sharpness and detail. (And a few other things, too, I hope! :-)

Continue reading How I Sharpen – An Overview

Combining Exposures in Wide Dynamic Range Scenes

My apologies, but as a result of a move to a new hosting company this article is no longer available. I’m hopeful that I’ll be able to recreate it or a replacement eventually.