Tag Archives: report

Fujifilm GFX and Canon 5DsR part II

Earlier I shared the beginning of an article that compares the Fujifilm GFX 50S and the Canon 5DsR, two cameras with different formats but approximately the same sensor resolution. That article (“Fujifilm GFX and Canon 5DsR” wasn’t complete … and now I’m back with one more point of reference.

When it comes to resolution, making judgments based on screen images has its limits. For example, 100% magnification crops “show” you things that won’t be visible even in  a very large print, and in many cases you must interpret what you see in the screen image in order to speculate about what the print will look like. As we say, “The proof is in the print.”

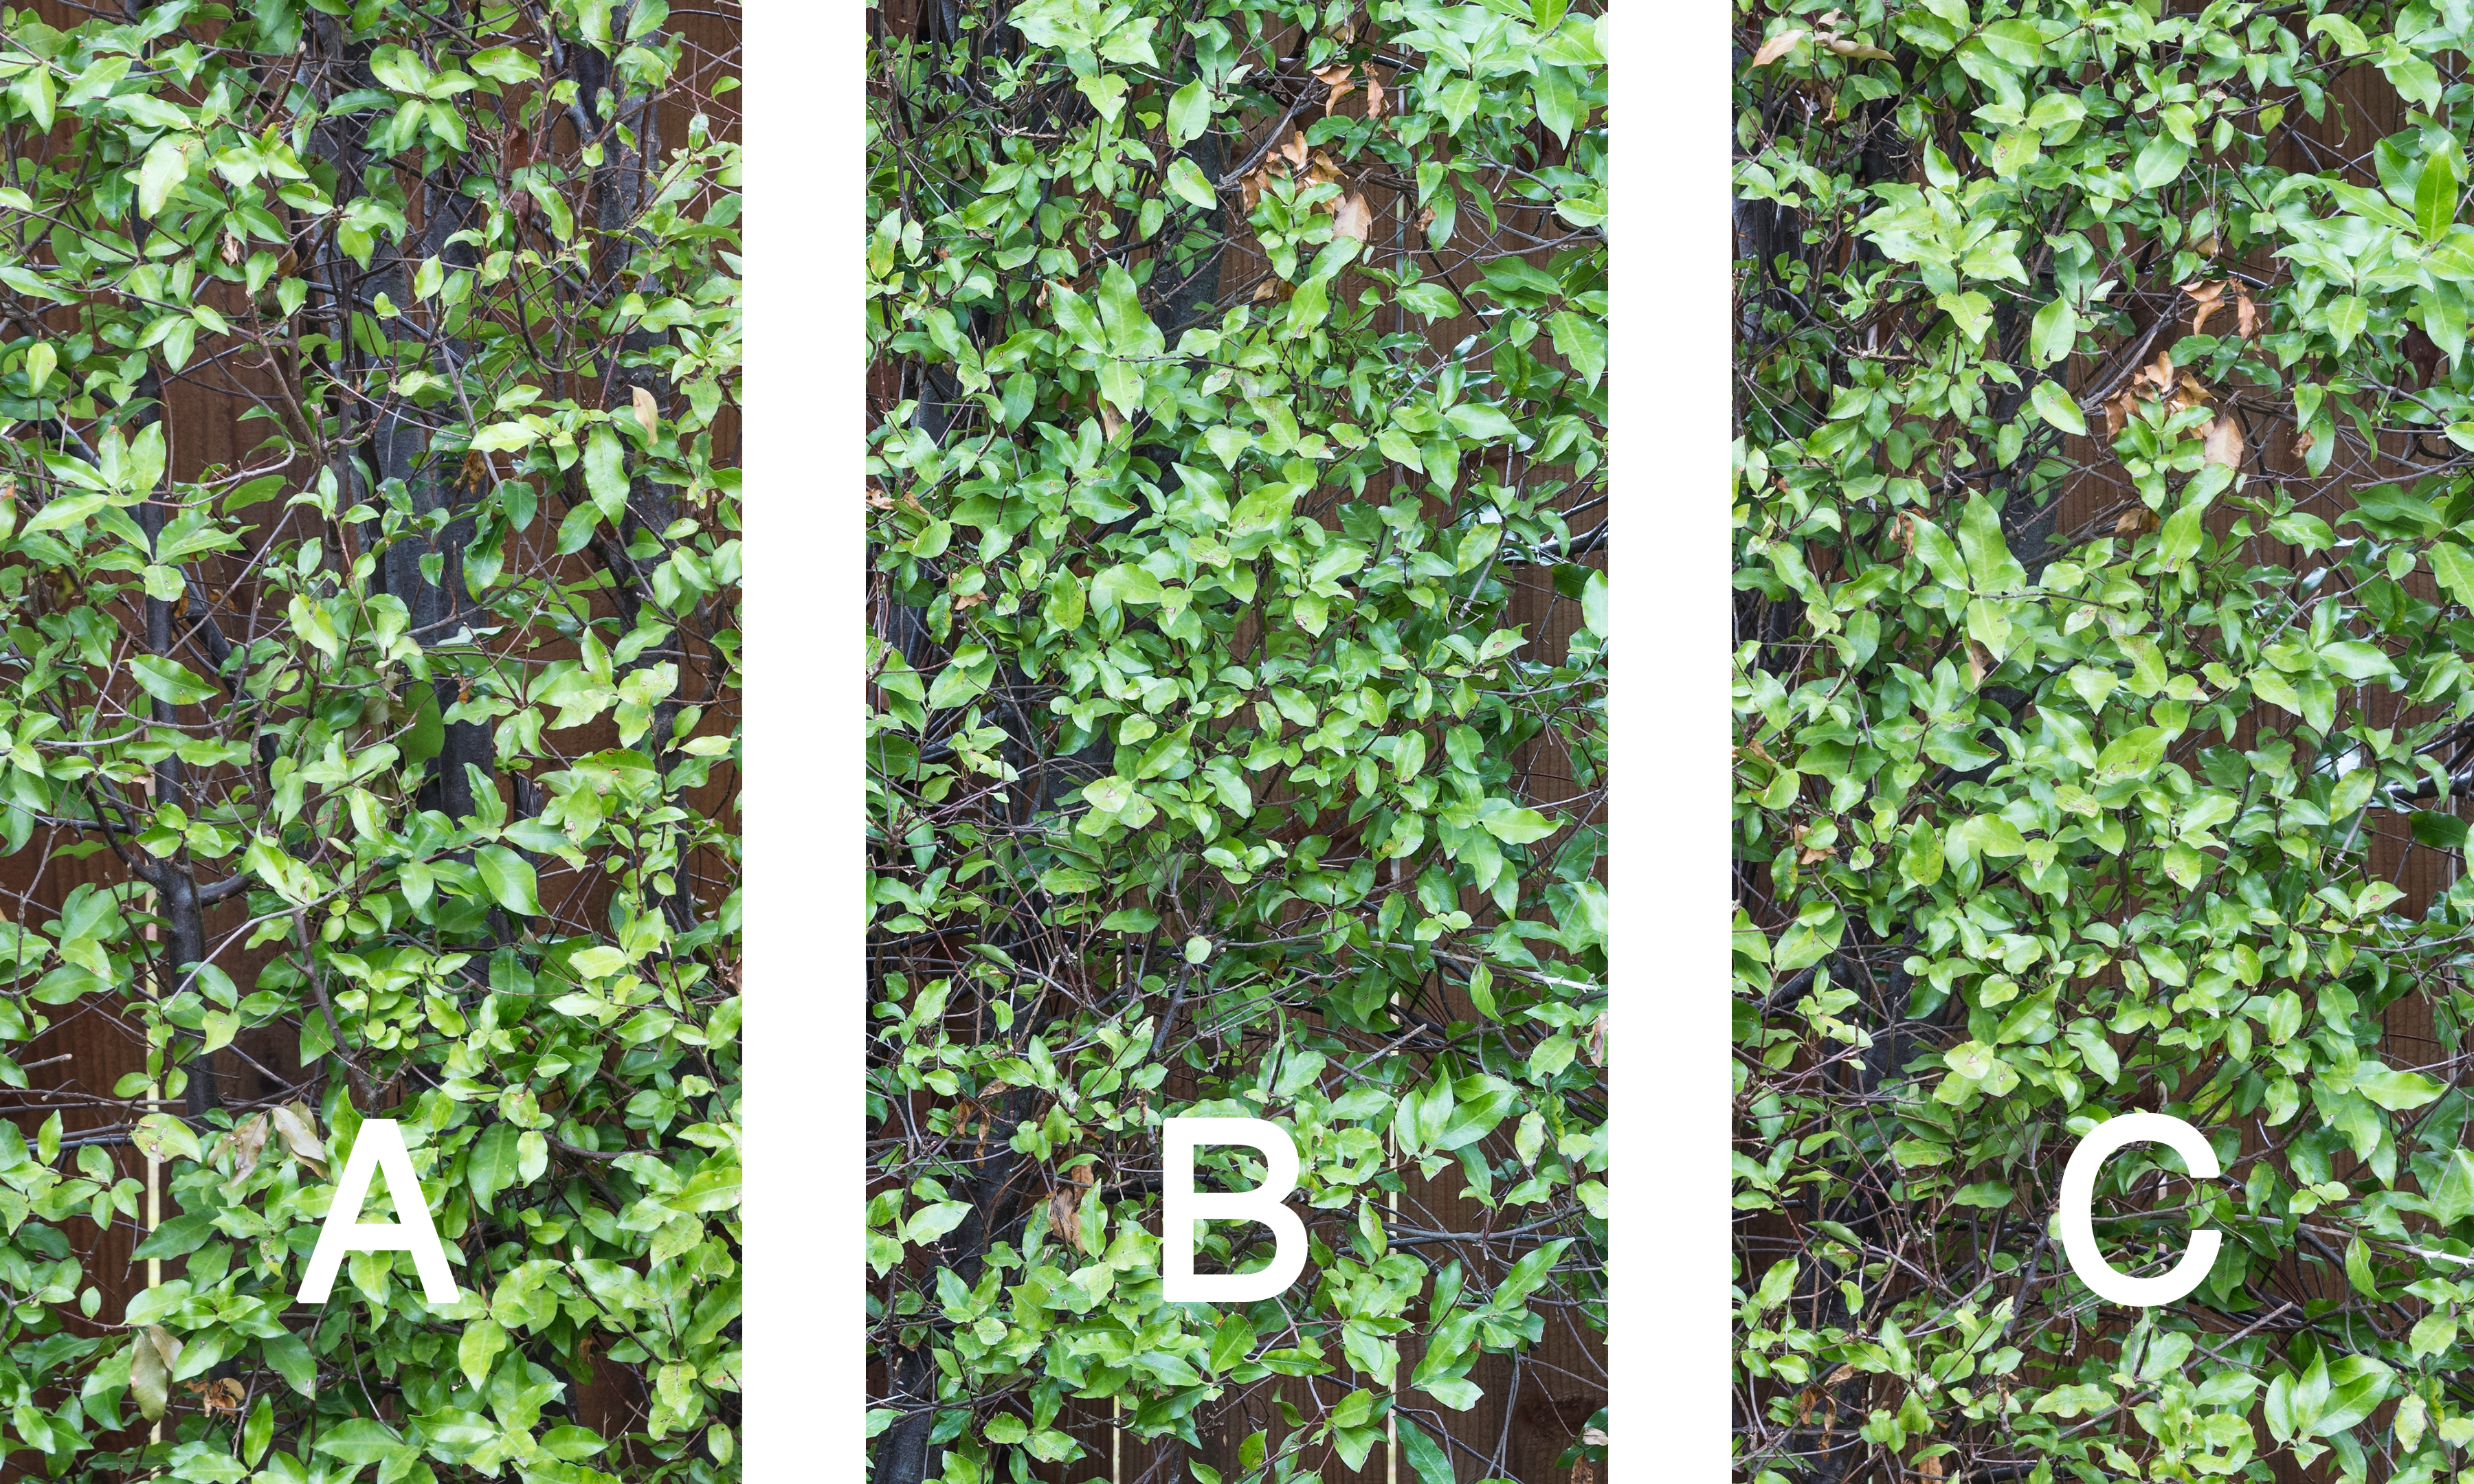
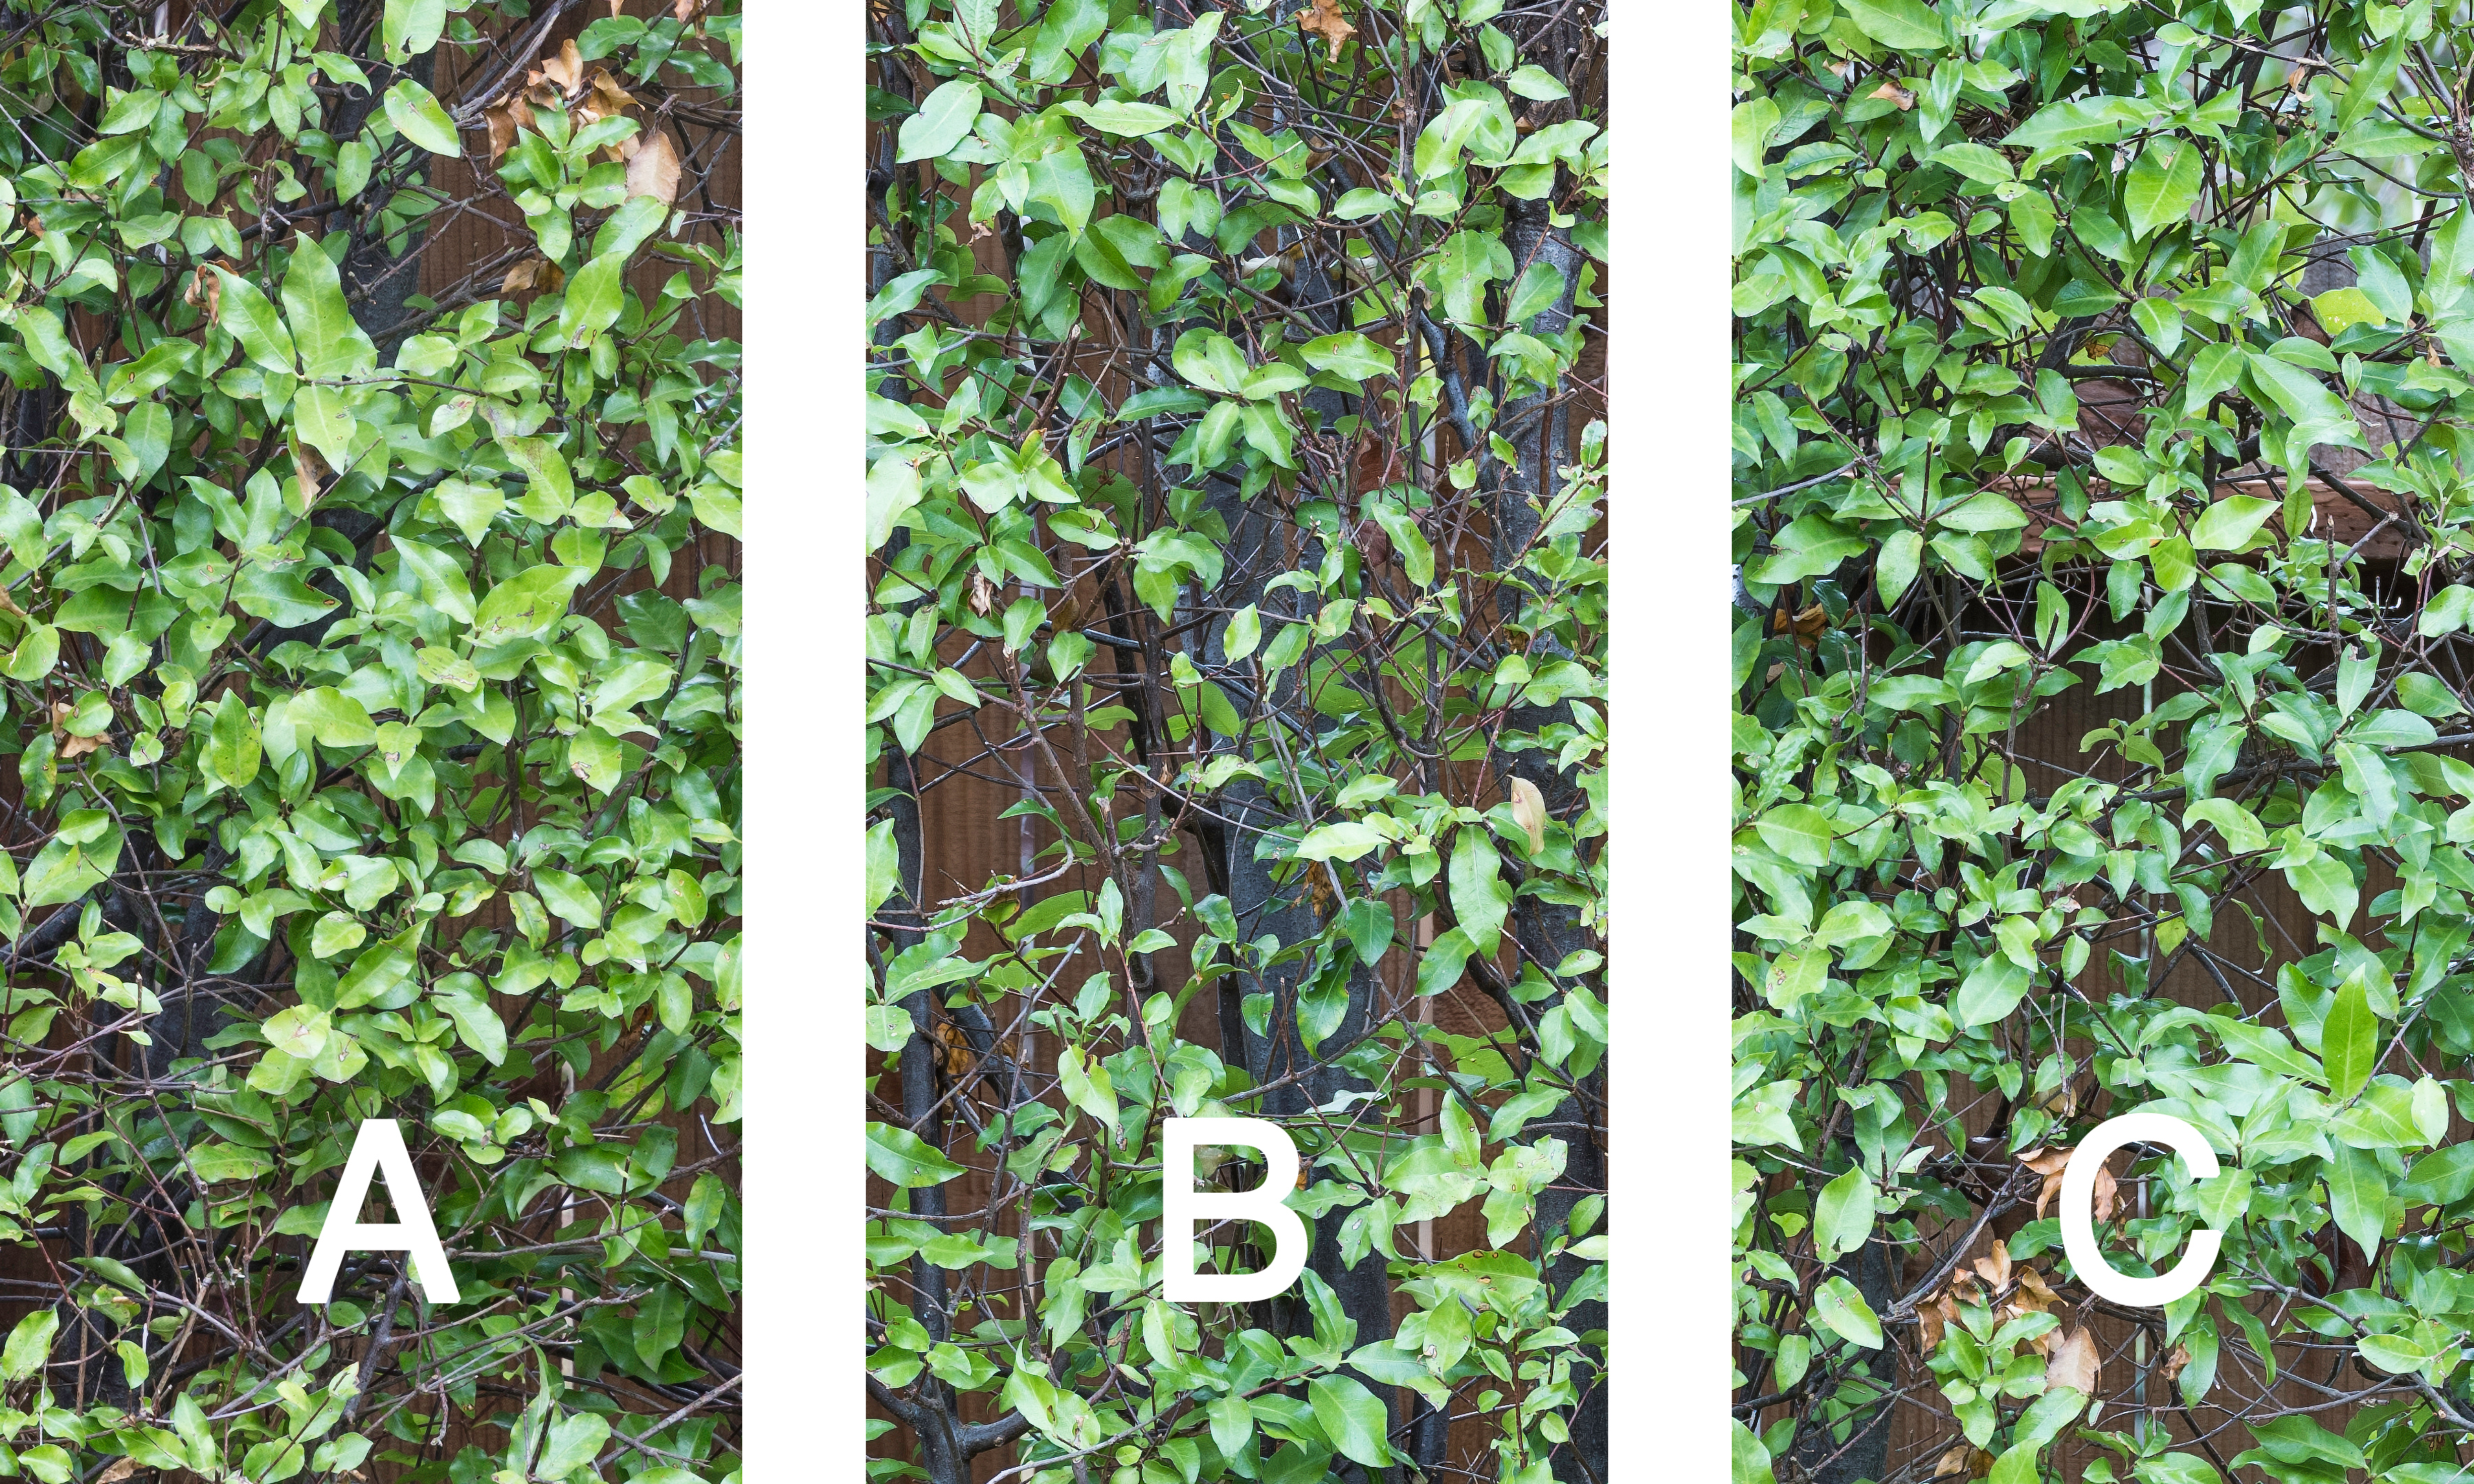
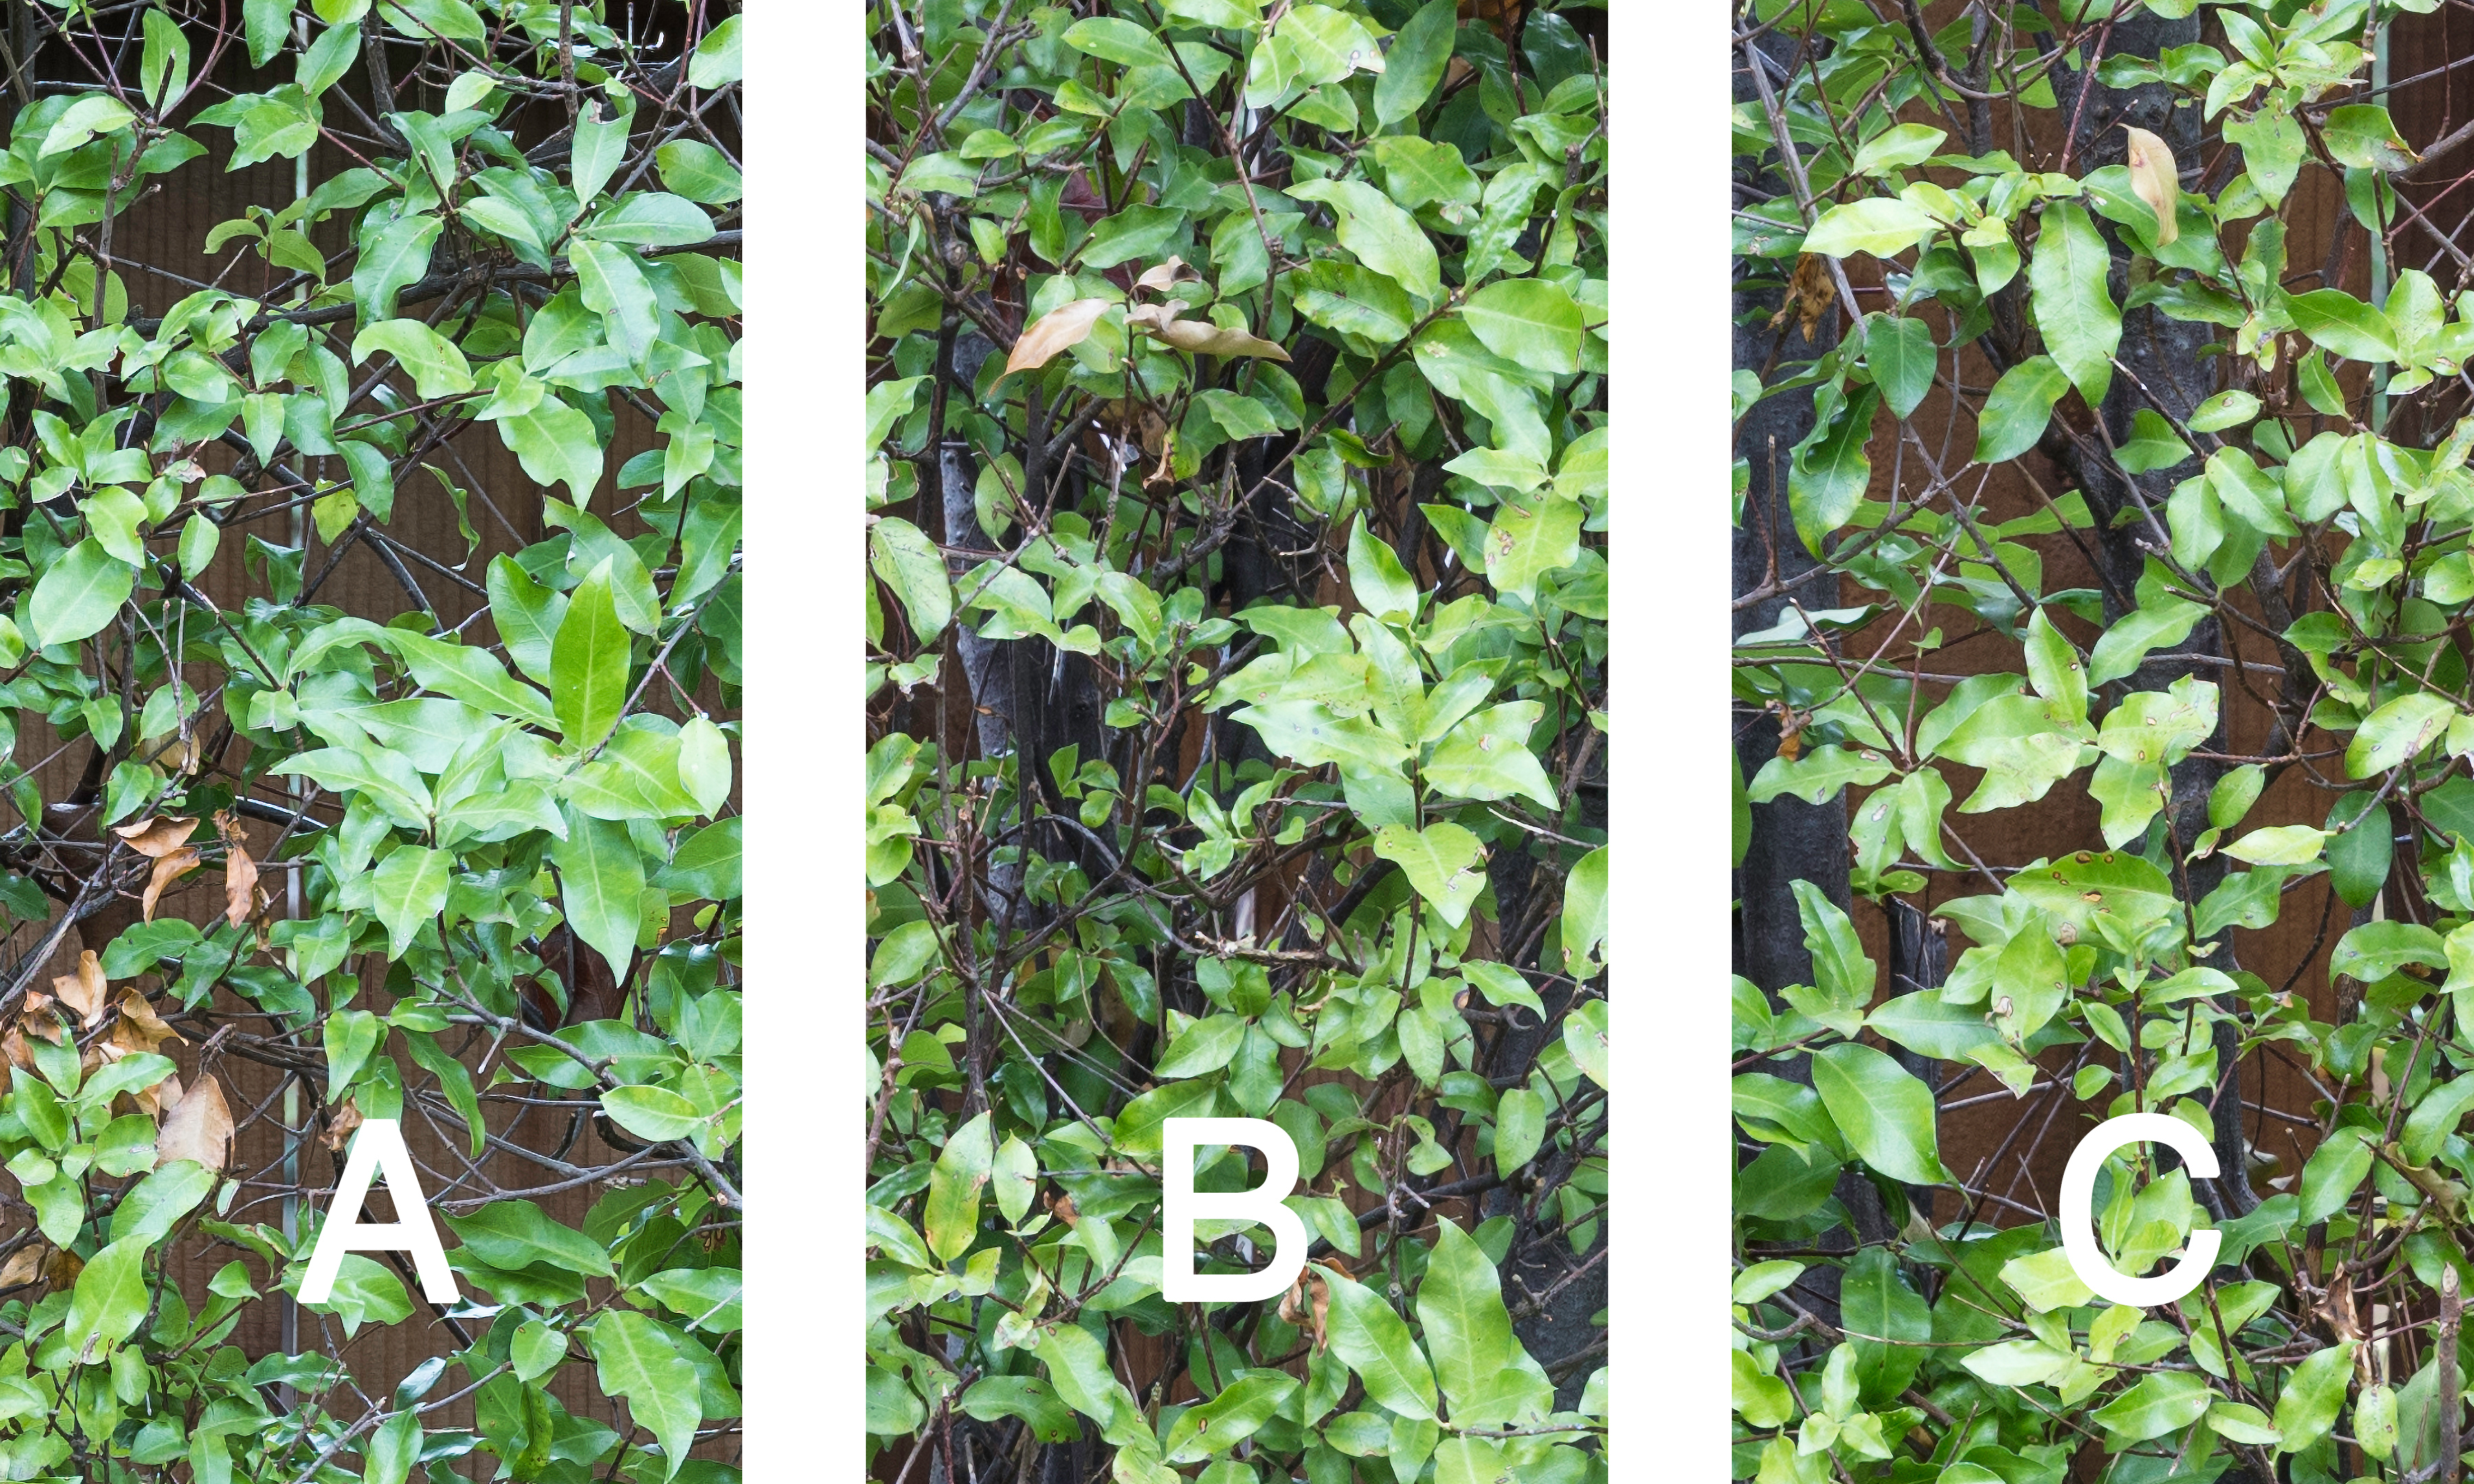
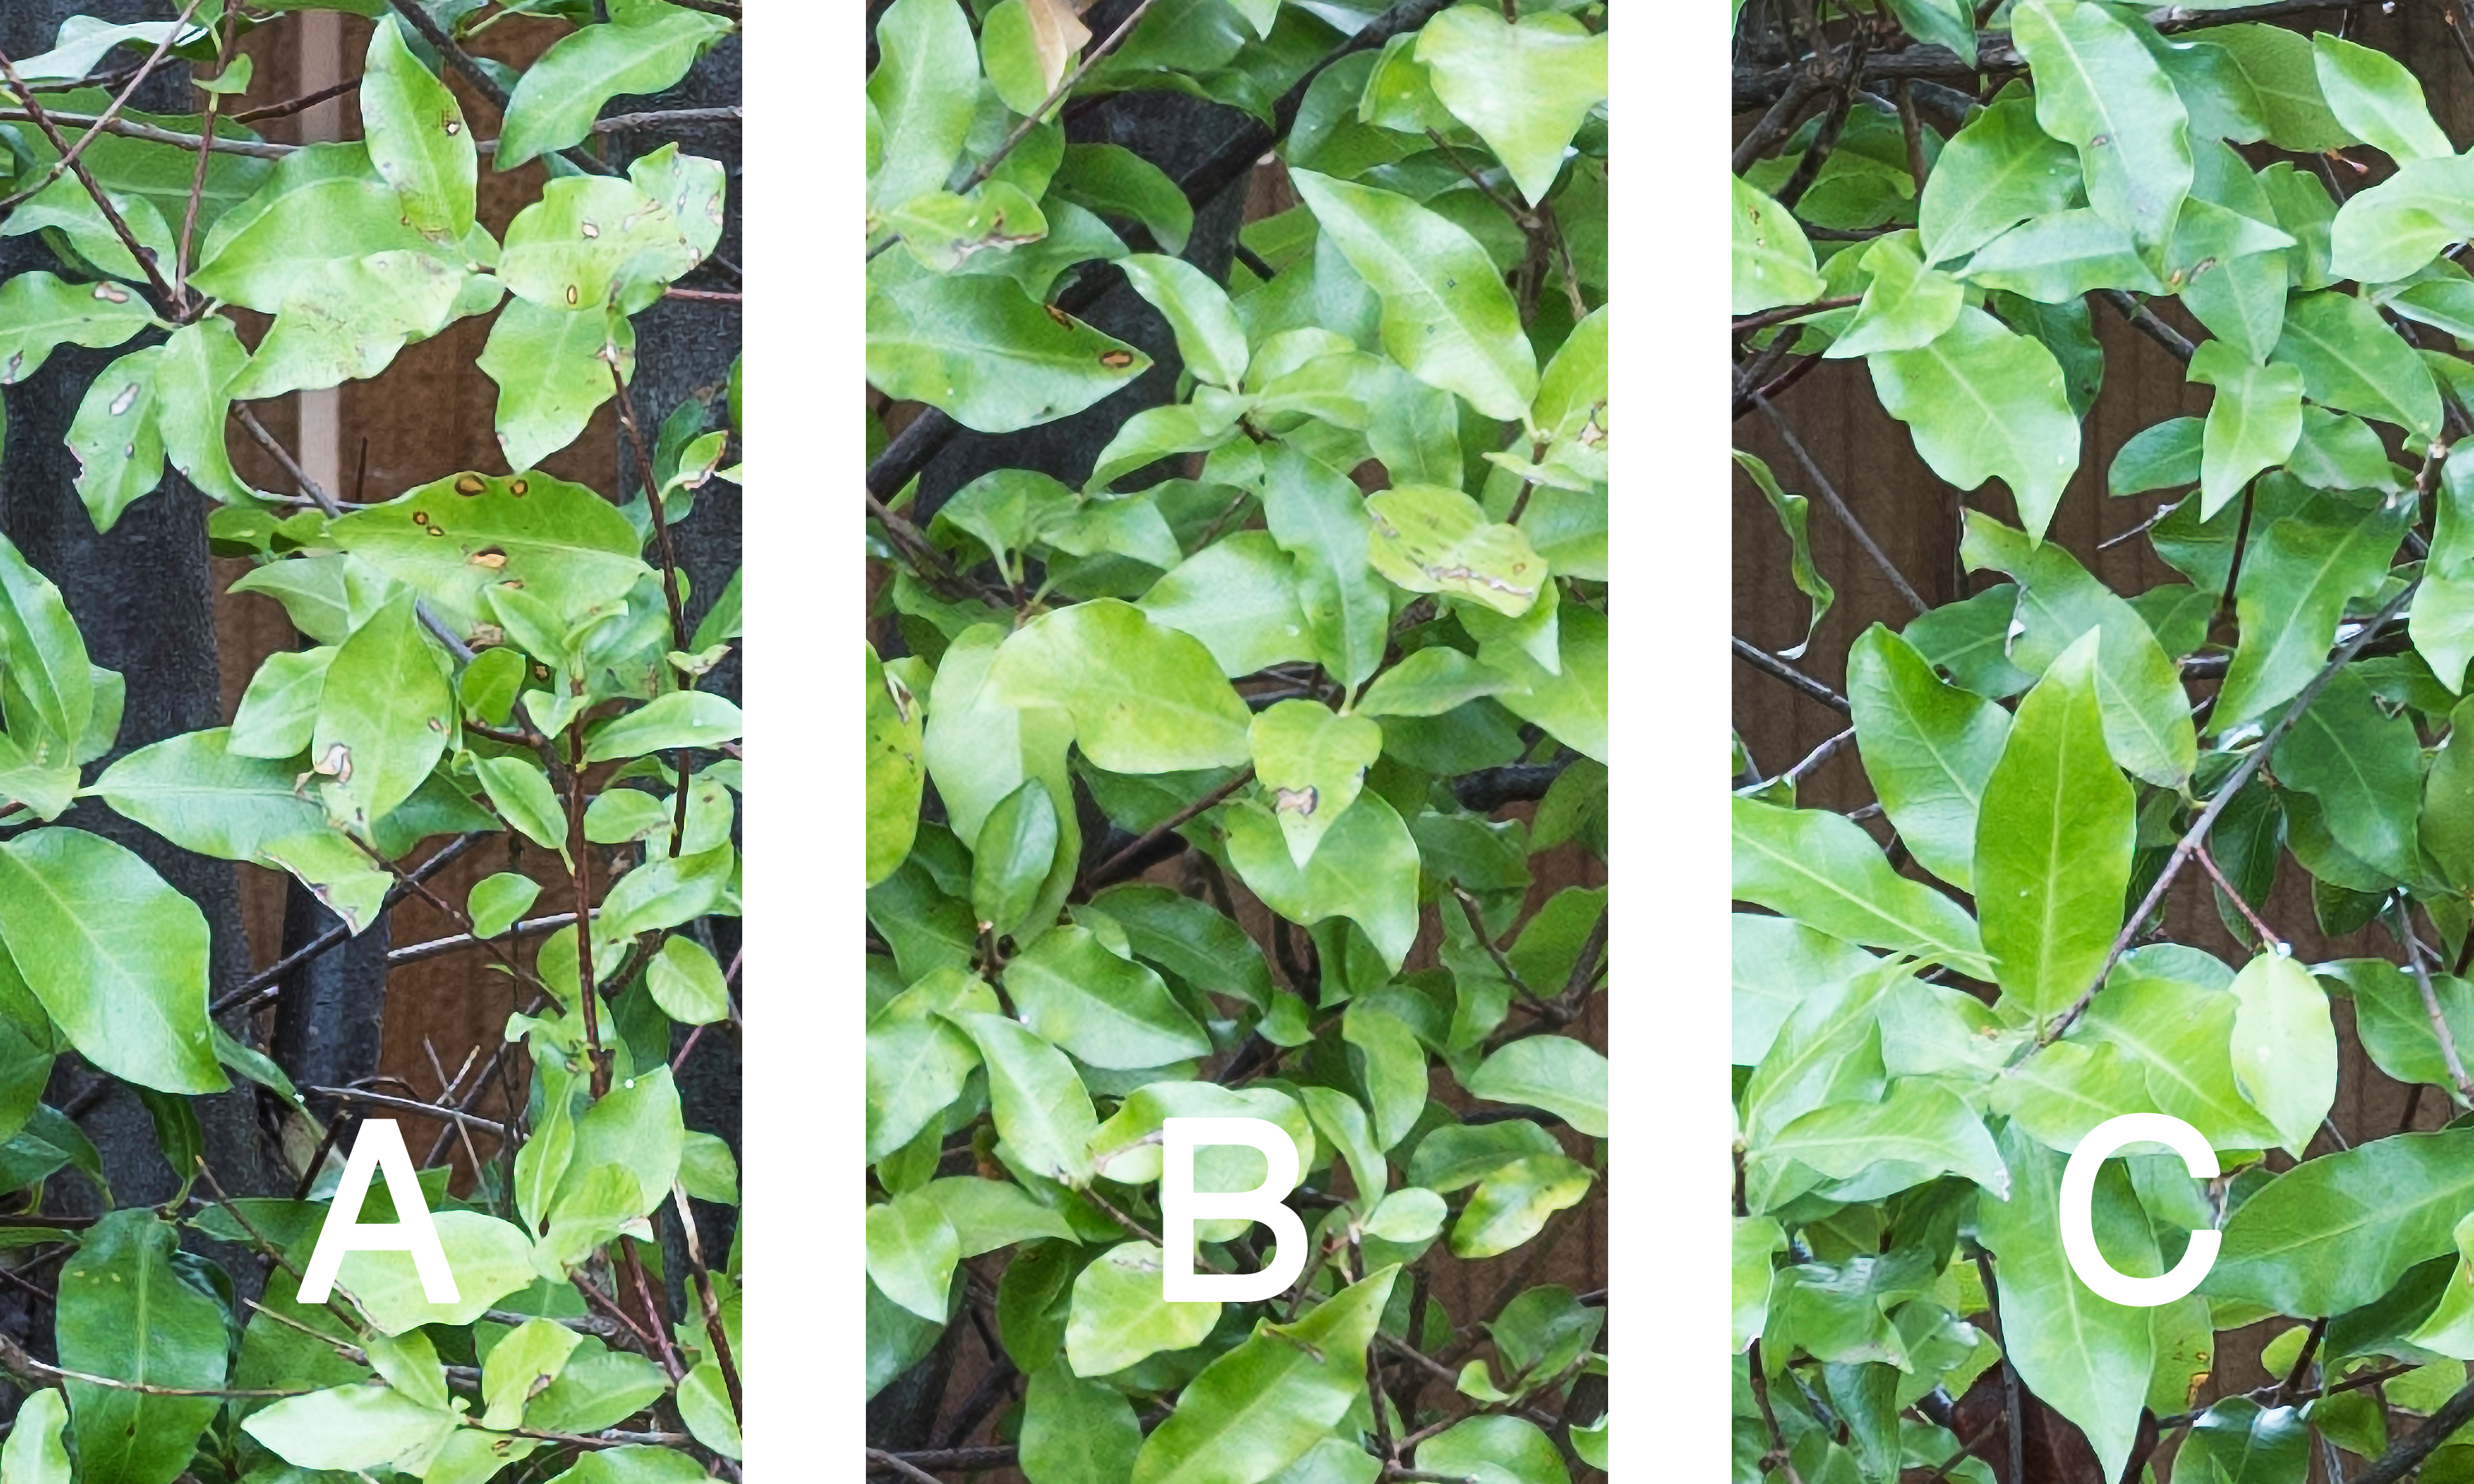
With that in mind, I have prepared some files that may be useful for comparing print resolution from Fujifilm GFX 50S and the Canon 5DsR. These files each hold three “test strips” labeled A, B, and C. The files have been formatted for producing prints with a print area of 10″ wide and 6″ tall (use letter-size paper) when printed at a resolution of 360. They are sRGB color files in the highest quality (Photoshop: 12) jpg format.

There are four files. Let’s call them:

(Click on the links to see and download the files.)

IMPORTANT NOTE: When first posted, these links went to downsized files rather than the full size print-ready files. This was corrected on 1/21/18. The print areas of these files should be 3600 pixels on the long side, for printing 10″ long at 360 ppi.

Viewing them on screen is not the object here — in fact, for reasons I won’t go into here, trying to evaluate that way is of very limited value and may mislead you. (For example, the files have been optimized for print in ways that may make them look poor on screen at 100% magnification.)

You will need to print.

Since there are four samples, you’ll need to make four letter-size prints. The correct settings will probably be entered automatically, but check that the print area is 10″ wide and 6″ tall and that the resolution is set to 360.  As you download and print the files you may wish to make a note on each (in pencil or ink) indicating which file it is — sample 1, sample 2, sample 3, and sample 4.

Observe each print carefully. Note anything you can see related to the resolution of each printed strip A, B, and C. (Note that this is only a resolution test — don’t worry about things like image size, brightness, color, and so forth.)

In order to avoid confirmation bias I’m not going to reveal anything else about the files at this time. Once a few people (or a lot of people?) have weighed in with their observations — please use the comments below — I’ll reveal more important information about what you are looking at.


G Dan Mitchell is a California photographer and visual opportunist. His book, “California’s Fall Color: A Photographer’s Guide to Autumn in the Sierra” is available from Heyday Books and Amazon.
Blog | About | Flickr | Twitter | FacebookGoogle+ | LinkedIn | Email


All media © Copyright G Dan Mitchell and others as indicated. Any use requires advance permission from G Dan Mitchell.

Sierra Fall Color Update (9/20/16)

Even though the calendar reports that a few days of summer still remain, and the thermometer here in the San Francisco Bay Area still reads hot enough for summer, the annual autumn color show is now underway in the Sierra Nevada. I’m just back from four days “over there,” and I’d like to share a bit of what I saw, along with a few hunches about where things might go over the next few weeks. (Disclaimer: Predicting fall color is very much an inaccurate science — kind of like predicting the outcome of the playoff games before they begin. Over the years I’ve been surprised many times, and we really won’t know how this year’s color plays out until it happens.)

Early Fall Color
Early fall color from aspens on rocky slopes in the Eastern Sierra Nevada

Early Fall Color. Sierra Nevada, California. September 19, 2016. © Copyright 2016 G Dan Mitchell – all rights reserved.

Between September 16 and 19 I visited the Yosemite around Tuolumne Meadows, a few spots well east of the Sierra with views back toward the range, the Mono Basin, US 395 between Conway Summit (just north of Mono Lake) and Bishop Canyon, and Bishop Canyon itself.

Acknowledging the risk of pronouncing this to be an “Early Aspen Season This Year!”, I’m going out on a limb and saying that it did seem like some of the color is progressing on an early than usual schedule. I usually wouldn’t both seriously hunting for aspen color in the Sierra this early, but I found a number of places with color worthy of photographing. In fact, I had the joy of photographing alone in some locations that will be overrun by photographers in a few weeks! (To be clear, and as I’ll clarify below, there are still lots of very green trees!)

For example, the photograph above was made up in Bishop Canyon at between 8000′ and 9000′ in a place that I visit every year. While these particular trees are often among the earliest in the area to change colors, seeing almost an entire slope of yellow/gold this soon is not what I would expect.

Most of the early color comes from small aspens, growing at relatively higher elevations, and often on what seems to be margins terrain — in very rocky areas, along talus slopes, and it areas that are typically dry. There is some extensive color in some areas east of the Sierra, areas that are drier and tend to support the smaller “scrub” aspen trees.

Early Aspens, Sierra Dawn
Sierra Nevada dawn and early season aspen color

Early Aspens, Sierra Dawn. Sierra Nevada, California. September 17, 2016. © Copyright 2016 G Dan Mitchell – all rights reserved.

Would I recommend going up there right now to see the color? Not exactly, though if you do go you’ll be able to find some nice color if you poke around a bit in the usual places, emphasizing the higher and rockier locations. That said, there are still a lot of very green trees, and the vast majority of the bigger and taller trees are essentially still completely green. This is especially true in the low elevation canyons, where the trees often grow larger and are sheltered more from the elements.

When will the rest of the trees change? Good question! I don’t know, but I have some hunches. Typically they would get their color after the start of October, and some years ago I would look for the best color beginning a few days into October and continuing through the second week and possibly a bit later as the final good color comes to large, low elevation aspens. My thinking this year is that last year’s (2015) pattern may be a guide to this year as well. Color last year also started a bit early. Last year it also looked like some trees were stressed by the prolonged drought. But in 2015 many of the bigger trees in areas perhaps less affected by drought seemed to change on almost their typical previous schedule. This meant that at any given moment it might have been a bit harder to find the “perfect grove,” but that the season actually lasted longer due to the early start.

Speaking for myself, if I had a choice between going early in the usual time frame (starting near the beginning of October) and going later (say at the end of the second week of the month) I would be more inclined to gamble on the early time rather than the later this year. In round numbers, perhaps aiming of the first week of October would be a good bet — though I’m also confident that, barring weather surprises, there will still be color at lower elevations and among the largest trees later on, too.

Happy aspen hunting!


G Dan Mitchell is a California photographer and visual opportunist. His book, “California’s Fall Color: A Photographer’s Guide to Autumn in the Sierra” is available from Heyday Books and Amazon.
Blog | About | Flickr | Twitter | FacebookGoogle+ | LinkedIn | Email


All media © Copyright G Dan Mitchell and others as indicated. Any use requires advance permission from G Dan Mitchell.

A Small Test: Fujifilm X-Pro2 Mirrorless and Active Subjects

I want to share the results of a little informal test I did today using my Fujifilm X-Pro2 (B&H | Adorama) mirrorless interchangeable lens camera and a Fujifilm zoom lens to photograph an active subject. First, here is an unremarkable photograph, aside from the fact that I would probably not have used my previous mirrorless camera to photograph this subject.

Fujifilm X-Pro2, ISO 400, f/8, 50-140mm lens at 140mm, handheld

Read on to find out why I photographed this and what I learned from it.

Background

I first used a mirrorless digital camera way back before the 21st century began — before there were DSLRs there were a number of early digital cameras, and my first was an Apple QuickTake! I used several others from a range of manufacturers before I acquired my first DSLR in about 2003.

As a group, mirrorless cameras have had some problems. One of the most glaring has long been slow autofocus (AF) speeds. Those very early cameras were often just plain awful in this regard, but they got better over the years.

Until recently I used a Fujifilm X-E1 mirrorless interchangeable lens camera, and it was my primary camera for travel and street photography for about 3 1/2 years. Its AF was fine for most things, but I also had to learn to adapt to slow AF in low light and with low contrast subjects — and the issue was more acute with some lenses than with others. For this reason — and a few others, including electronic viewfinder (EVF) display latency — I would never have thought to use that camera for photograph active subjects. Continue reading A Small Test: Fujifilm X-Pro2 Mirrorless and Active Subjects

Canon EOS 5DsR/5Ds: My Experience

These days I use the Canon EOS 5DsR for much of my photography — particularly my landscape, nature, wildlife, and long-exposure night photography. Since people often ask me about the camera, I have decided to offer this write-up. I’ll try to cover some things about the camera that work well for me, acknowledge one or two very small issues, and consider the kinds of photographers for whom it (or its twin, the Canon EOS 5Ds)  might be a great choice. (This isn’t the first time I’ve written about aspects of this camera’s performance, and I have included a list of some of my other posts near the end of this article.)

Canon EOS 5Ds DSLR
Canon EOS 5Ds DSLR

The 5Ds and 5DsR are both 51 megapixel (MP) full frame DSLR bodies from Canon. They currently provide the highest sensor resolution available from a full frame digital camera and, as such, are targeted to photographers who need particularly high image resolution and who will photograph and post-process in ways that provide this. The 5DsR cancels the effect of the anti-aliasing filter found in the 5Ds — more on that subject below.

It is probably fair to say that the main attraction of these cameras is that high-resolution sensor, a fact that might lead some photographers to ask whether or not they will be able to take advantage of the high-resolution. Compared to earlier 5D-series cameras, the 5Ds/5DsR provide some other improvements, too. The autofocus (AF) system has been updated, noise handling is very good, and the  camera produces high dynamic range files that can be pushed and pulled quite a bit in post. Some updates have been made to the hardware and software interface of the camera, too.

Two Sandhill Cranes in Flight
A pair of lesser sandhill cranes in flight above California’s San Joaquin Valley

Sensor Resolution

There is no question that these cameras can produce very high-resolution images. Photographers who work carefully and who make very large prints will be pleased. I have made test prints equivalent to 30″ x 45″ prints that look very good and it is possible to go even larger. However, before you jump at the highest resolution full frame camera purely on the basis of higher resolution, you should ask yourself a few serious questions. Continue reading Canon EOS 5DsR/5Ds: My Experience