
Note that this is an older article from 2012. While the concepts are largely the same with contemporary cameras and software, some aspects of the article are now a bit date.
(In another forum someone asked a question – actually, more like posed a challenge – related to how much usable detail and quality could be extracted from a raw file that contained areas of very low luminosity, as could happen with a badly underexposed image or with an image of a scene with a very large dynamic range. Since I went to the work of responding and illustrating my response, I figured that I might as well share it here, too. With minor revisions, here it is.)
First, I actually have a “real” version of this photograph in which highlights were slightly blown, but which I preferred to use since I could bring them back in post and get a bit more shadow detail to start with. (It looks a bit bright to me as an on-screen jpg, but it makes a fine print.) That photograph ended up looking like this:

This photograph and the other I’ll move to below were both shot from a tripod with a Canon EOS 5D Mark II at ISO 100 using the Canon EF 24-105mm f/4L IS at f/16. While the “keeper” used for the photograph above had a 1/4 second exposure, the example I’ll use below was shot at 1/30 second.
The exposure challenge in this scene was the very large dynamic range between the bright spot of sky at the head of the canyon and the much darker colorful foliage in relatively deep shadow in the foreground. Exposing for optimal quality in the foreground would completely blow out the sky, while exposing for the sky would necessarily grossly underexpose the foreground.
I originally thought that I might like to have four bracketed exposures in case that would let me produce a better final image via layer blending, but it turned out to be unnecessary and the final image (as shown above) has a single source file with no blending. However, this means that I still happen to have one very badly underexposed (by three stops) version at 1/30 second which I’ll use here as the starting point for what I plan to illustrate in this post. Follow along with me and see what I can do with the very underexposed version of the file…
Here is a screen shot of the raw image “straight out of the camera,” as displayed in Adobe Camera Raw (ACR):

Boy, that is ugly! (But on the plus side, no blown out sky! ;-)
Here is a copy of the initial settings panel in ACR for this unconverted RAW:
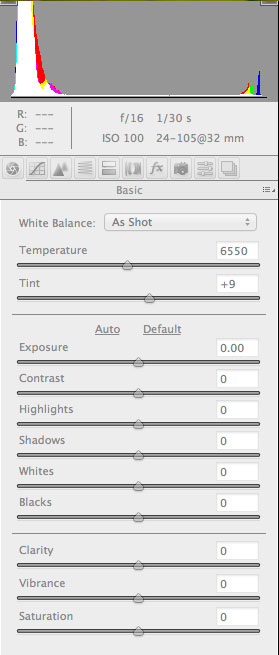
The histogram in the foregoing illustration shows the nature of the challenge with this subject, namely that an exposure that controls the highlights so that they do not blow out results in the rest of the frame being extremely dark.
I applied a quick set of adjustments to the file in ACR as follows:

To summarize things changed in ACR raw conversion:
- Color (“white balance,” “temperature,” and “tint”) was left as it came from the camera.
- Exposure pushed to +2.20
- Contrast boosted to +35
- Highlights reduced to -25
- Shadows boosted all the way to +100
- Whites reduced to -25
- Saturation boosted to +12
- Noise reduction (NR) settings of Luminance:25 and Color:25.
NOTE: If updating this image today I would use the remarkably effective Adobe AI Denoise feature in ACR to deal with the inevitable noise.
These radical adjustments provide a conversion that looks like this – a lot lighter in the shadows, no blown out sky, but not enough contrast in the darker areas to suit my taste:

Next I moved on to Photoshop…
I opened the image as a 16-bit ProPhoto smart layer. I applied some default sharpening – more or less the settings that I often use as starting point in my sharpening workflow:
- SmartSharpen with radius: .7 and amount 150
- USM with radius: 50 and amount: 12
I applied a “normal” mode curve to the entire image to further bump up the underexposed areas and increase contrast in the darker tones–note that the flattening of the upper end of the curve is fairly irrelevant here since there are no tones in the image in that luminosity range:
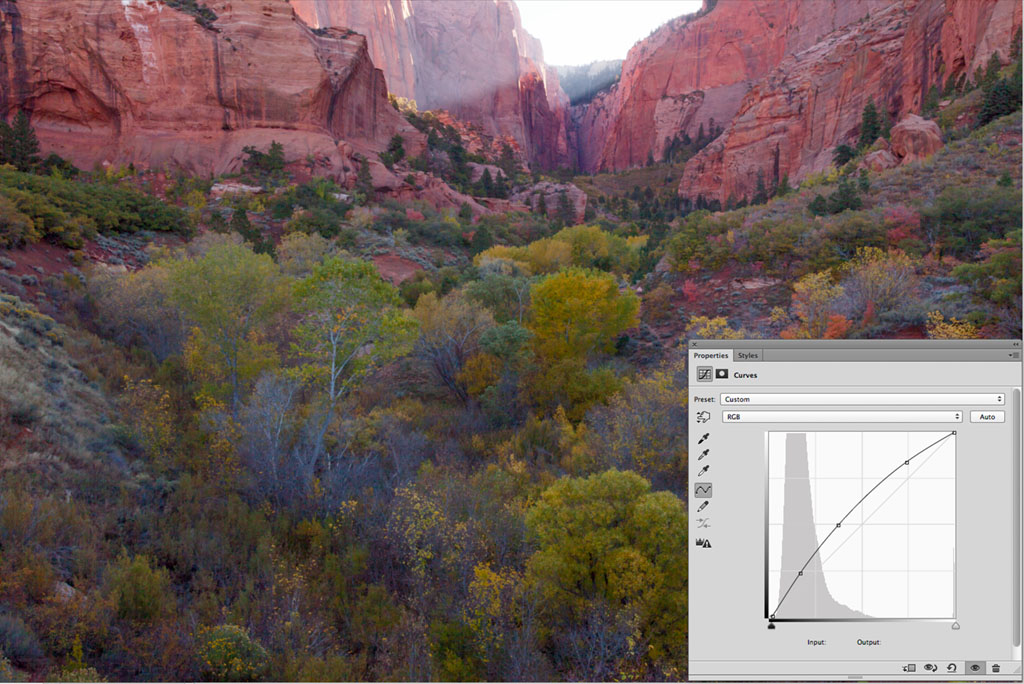
I used a layer mask to apply a second, even steeper luminosity curve to the lower 3/4 or so of the area of the scene:
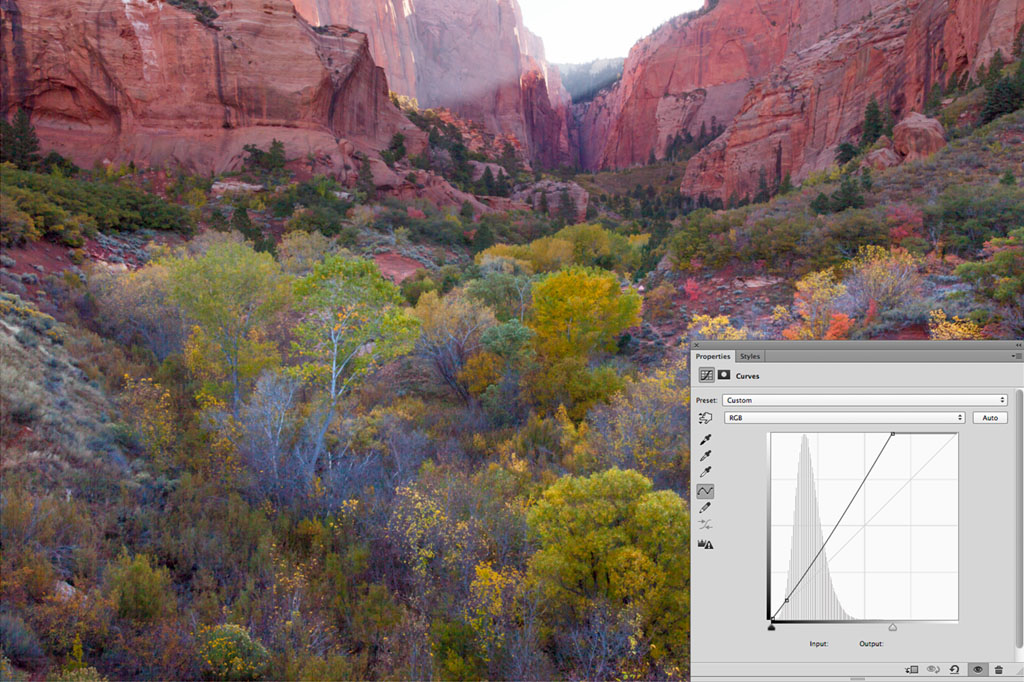
(By the way, these are crude and unsophisticated applications of curves, and I would not do things quite this way in a real post-processing workflow.)
Close up, at 100% magnification, it is clear that this is an image that has been manipulated. When I inspect this way on-screen I can see evidence of luminosity noise (duh!) and a bit of color noise and so forth. But what I’m actually interested in is what the print will look like. So, I duplicated the image, flattened it, sized it to make a 24″ wide print, did my usual output sharpening, cropped a letter-size section out of the larger image and made a print on my Epson 7900 using my proofing paper, Epson Ultrapremium Lustre. (Note: This is a quick print and has not been post-processed for other elements such as color balance and so forth as I would normally do. It most certainly is not in a form that I would sell.)
I scanned the print of the section of the scene on my Epson v700 and reproduce it here. Pardon the probably obvious color issues, as I didn’t take the time to properly calibrate the scan, instead using default settings and leaving it as-is. Here is a copy of the scan of a crop of a small area of the test print, showing that somehow I managed to get to (what would b)e a 24″ wide print, a section of which looks like this…
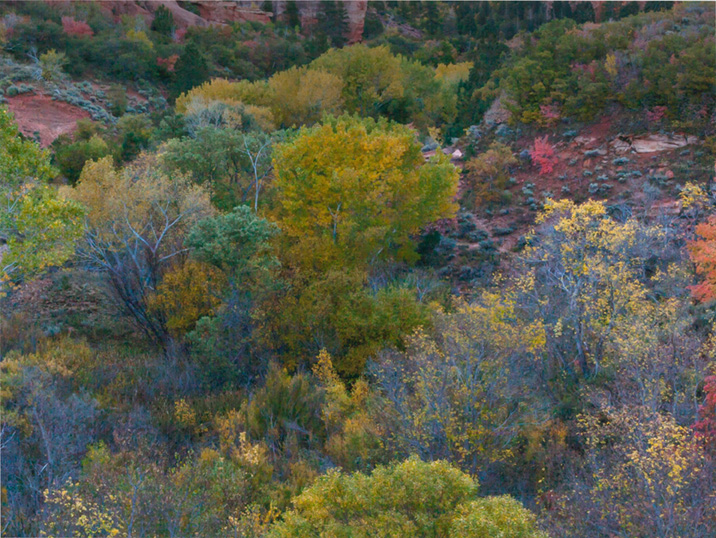
… by starting with a SOOC file that looked like this:
Again, the full image…
Keep in mind that this came from the raw file that was three stops underexposed. The one from which I created my real print (that is the basis of the first image in this post, and which prints beautifully at very large sizes) was made from a single exposure that was “exposed to and slightly beyond the right” at 1/4 second rather than 1/30 second, highlights recovered in post.
Kind of impressive, if you ask me!
Notes
- For the record, I regard this rendition as one that is unfinished and which would be unacceptable in its present form. For example, there is a blue cast to branches in the shadows that needs correction, and the red of the upper rocks now looks rather strange after the radical curves have been applied. These things can be fixed, but I have not done so here. The image is not presented here as a work of great photographic art, but only as a vehicle for technical illustration.
- (added 12/13/25) This article was originally posted in 2012 and based on a camera and software that were much less capable than what we have today… which means that even more remarkable results are possible now.
COMMENT OR QUESTION? Scroll down to the comment form.
G Dan Mitchell is a California photographer and visual opportunist. His book, “California’s Fall Color: A Photographer’s Guide to Autumn in the Sierra” (Heyday Books) is available directly from him. Blog | Bluesky | Mastodon | Substack Notes | Flickr | Email
All media © Copyright G Dan Mitchell and others.
Well done, Dan. There is a lot more potential in the raw files from recent DSLRs than most people credit, and you’ve demonstrated how to make use of the dynamic range that we often think is “lost in the noisy shadows”. While you intentionally chose an underexposed file for the demo, the same techniques are clearly useful when we are confronted with a challenging scene combined with insufficient opportunity for bracketed exposures.
Good job!
Thanks. We really can do a lot with raw files and the powerful post processing capabilities of today’s image editing software.
It is also true that some occasionally become overly-obsessed with “noise free” images when a) a bit of noise that might be visible when inspecting at 100% magnification is often invisible even in a fairly large print and b) even when a bit of noise is visible in a print, it is often less than we would have seen in prints from film and it isn’t even visually objectionable.
Dan
Thanks for putting together this great tutorial.
This is a great Tutorial, thank you so much for sharing your insights!